 Sign-up for free online course on ANSYS simulations!
Step 3: Specify Inputs
Specify Material Properties
Under Input Data, click Set Properties.
Set Youngs modulus E: 73e9
The default Poisson ratio matches our value.
Click OK.
Under Current Settings, you should now see Properties set.
Specify Surface Boundary Conditions
Under Input Data, click Set Surface BC's. This displays the edges for which we have to specify surface BC's and brings up the dialog box for setting the BC's.
The normal and tangential tractions are zero for all these boundaries. This is the default in redAnTS. For each of the eight boundaries, click OK to accept the default surface BC's.
Specify Point Boundary Conditions
We need to specify point BC's at A, B, C and D.
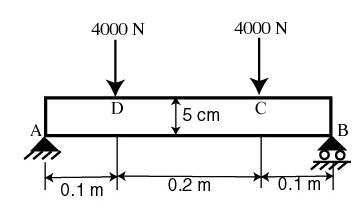
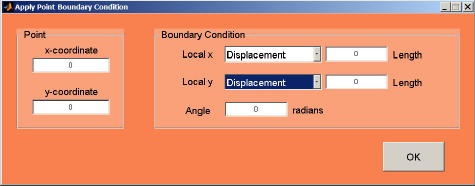
Specify BC at point A: Under Input Data, click Set Point BC's.
x-coordinate: 0
y-coordinate: 0
Local x: Select Displacement and retain 0 for value. This constrains the node at A in the x-direction
Local y: Select Displacement and retain 0 for value. This constrains the node at A in the y-direction
Click OK.
In the display, you should see an "X" at the node at point A; this indicates that the point BC has been set for this node.
Specify BC at point B: Under Input Data, click Set Point BC's.
x-coordinate: 0.4
y-coordinate: 0
Local x: Leave default values in place. This means node B will be free to move in the x-direction.
Local y: Select Displacement and retain 0 for value.
Click OK.
In the display, you should see an "X" for the node at B.
Specify BC at point D: Under Input Data, click Set Point BC's.
x-coordinate: 0.1
y-coordinate: 0.05
Local x: Leave default values in place.
Local y: Set Force to -4000.
Click OK.
In the display, you should see a vertical line extending downwards from point D. This is actually a downward arrow that doesn't completely fit in the display window. Does this force act exactly at (0.1,0.05) as we had planned in step 2?
Specify BC at point D: Under Input Data, click Set Point BC's.
x-coordinate: 0.3
y-coordinate: 0.05
Local x: Leave default values in place.
Local y: Set Force to -4000.
Click OK.
Does this force act exactly at (0.3,0.05)? Check in the display.
Check that the software reports BC's set under Current Settings.