 Sign-up for free online course on ANSYS simulations!
Author: John Singleton, Cornell University
Problem Specification
1. Pre-Analysis & Start-Up
2. Geometry
3. Mesh
4. Physics Setup
5. Numerical Solution
6. Numerical Results
7. Verification & Validation
Exercises
Comments
Pre-Analysis & Start-Up
Pre-Analysis
We'll start by carrying out hand calculations to predict the expected maximum bending stress and deformation. We'll later compare the ANSYS values to these hand-calculation results.
Calculate the Maximum Bending Stress at x=0m
The maximum bending stress is calculated using Euler-Bernoulli beam theory.

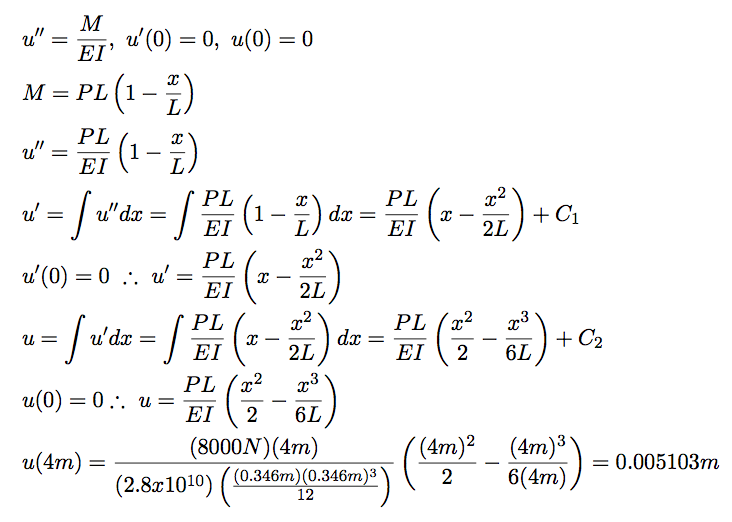
Calculate the Total Deformation at x=4m

Start-Up
Optimizing Monitor Real Estate
This tutorial is specially configured, so the user can have both the tutorial and ANSYS open at the same time as shown below. It will be beneficial to have both ANSYS and your internet browser displayed on your monitor. Your internet browser should consume approximately one third of the screen width while ANSYS should take the other two thirds.

Open ANSYS Workbench
Click on the Start button, then click on All Programs. Depending on where you are attempting to access ANSYS, it may be under ANSYS 13.0, ANSYS, or Class. Once you locate ANSYS click on the the workbench button,  . It may take some time for ANSYS to open. Once ANSYS opens your computer monitor should look comparable to the image below.
 .
.
Static Structural Analysis System
The problem at hand is a static structural problem, so click and hold down the mouse button on the Static Structural (ANSYS) button,  , and drag it over to the project schematic window. When you begin to drag the Static Structural (ANSYS) button over to the Project Schematic window a green dashed box should appear as seen in the image below.

Drag the Static Structural (ANSYS) button into the green box until it turns red and has the text "Create standalone system" within it, then release the mouse button.

Change the name of the project to Cantilever and your workbench window should look similar to the image below.

Engineering Data
The specific properties of our material needs to be inputted into ANSYS. Start by right clicking on Engineering Data and then clicking on Edit.. as seen below.

At this point a new window will open. Under Outline of Schematic A2: Engineering Data there will be a box with text inside that says "Click here to add a new material". We'll call our material "Cornellian". Click on that box and type in Cornellian and then press enter.

Now, expand the Linear Elastic tab on the left and double click on Isotropic Elasticity.

Now, the properties of "Cornellian" need to be entered. Set the Young's Modulus to 2.8e10 Pascals and set Poisson's Ratio to 0.4. Note that the stiffness matrix for the beam element is independent of the Poisson's Ratio. Hence the solution will not change if a different Poisson's Ratio is used.

The material "Cornellian" will be assigned to our model in a later step. Here we have just input its Young's Modulus and Poisson's ratio.
At this point the project can be returned to. Click on the Return to Project button,  at the top.
Saving
It would be of best interest, to save the project at this point. Click on the "Save As.." button,  , which is located on the top of the Workbench window. Save the project as "Cantilever" in a suitable folder. When you save in ANSYS a file and a folder will be created. For instance if you save as "Cantilever", a "cantilever.wbpj" file and a folder called "cantilever_files" will appear. In order to reopen the ANSYS files in the future you will need both the ".wbpj" file and the folder. If you do not have BOTH, you will not be able to access your project.