 Sign-up for free online course on ANSYS simulations!
Unable to render {include} The included page could not be found.
Unable to render {include} The included page could not be found.
Plate With a Hole Tutorial - Pre-Analysis and Start-Up
How to solve this Problem
There are two main methods to solve this problem. Refer to the diagram below:

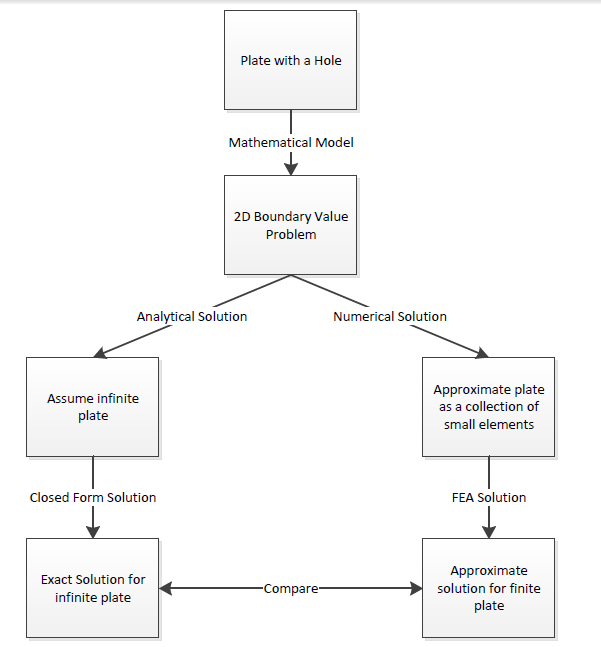
As seen in the flow chart, we can either assume the geometry as an infinite plate and solve the problem analytically, or we approximate the geometry as a collection of finite elements, and solve the problem numerically. First, we will assume the plate is infinite and will complete the analytical calculations.
Pre-Analysis Calculations
sigma_xx
First, let's begin by finding the average stress, the nominal area stress, and the maximum stress with a concentration factor.

The concentration factor for an infinite plate with a hole is K = 3. The maximum stress for an innite plate with a hole is

Although there is no analytical solution for a nite plate with a hole, there is empirical data available to find a concentration factor. Using a Concentration Factor Chart (3250 Students: See Figure 4.22 on page 158 in Deformable Bodies and Their Material Behavior), we find that d/w = 1 and thus K ~ 2:73 Now we can find the maximum stress using the nominal stress and the concentration factor

sigma_r
Now, let's look at the radial stress varies in the plate:

at r=a

at r>>a

sigma_theta
Now we will examine how sigma_theta varies in the plate. We will approach this very similarly to how we approached the examination of sigma_r:

at r = a

at r>>a

Now we will examine the stress far from the hole at theta = 0 and theta = pi/2

ANSYS Simulation
Now, let's load the problem into ANSYS and see how a computer simulation will compare. First, start by downloading the files here
The zip file should contain the following contents:
- Plate With a Hole_files folder
- Plate With a Hole.wbpj
Please make sure to extract both of these files from the zip folder, the program will not work otherwise. (Note: The solution was created using ANSYS workbench 12.1 release, there may be compatibility issues when attempting to open with other versions).
2. Double click "Plate With a Hole.wbpj" - This should automatically open ANSYS workbench (you have to twiddle your thumbs a bit before it opens up). You will be presented with the ANSYS solution.

A tick mark against each step indicates that that step has been completed.
3. To look at the results, double click on "Results" - This should bring up a new window (again you have to twiddle your thumbs a bit before it opens up).
4. On the left-hand side there should be an "Outline" toolbar. Look for "Solution (A6)".

We'll investigate the items listed under Solution in the next step in this tutorial.
Continue to Step 2 - Results
Go to all ANSYS Learning Modules