 Sign-up for free online course on ANSYS simulations!
Author: John Singleton and Rajesh Bhaskaran
Problem Specification
1. Pre-Analysis & Start-Up
2. Geometry
3. Mesh
4. Setup (Physics)
5. Solution
6. Results
7. Verification and Validation
Exercises
Care to skip the geometry and meshing steps? README
If you would prefer to skip the geometry and mesh steps, then you can download the necessary files here. Download the "zip" file, then extract the files to your working directory. In order to load the necessary files, go to the Workbench Project Page, then (Click) File > Open > "Cylinder.wbpj". Lastly, click here to skip ahead to Step 4 of the tutorial.
3. Mesh
In this section the geometry will be meshed with 18,432 elements. The geometry will 192 circumferential divisions and 96 radial divisions. Mapped face meshing will be used and biasing will be used in order to significantly increase the number of elements located close to the cylider.
Launch Mesher
(Double Click) Mesh
Mapped Face Meshing
(Right Click) Mesh > Insert > Mapped Face Meshing
Set Geometry to both portions of the surface body. You will have to hold down control in the selection process in order to highlight both halves. Click Update.
Circumferential Edge Sizing
(Right Click) Mesh > Insert > Sizing
Set Geometry to both edges of the surface body. You will have to use the edge selection filter and you will have to hold down control in the selection process in order to highlight both halves. Set Type to Number of Divisions, set Number of Divisions to 96 and set Behavior to Hard. Click Update to generate the new mesh.
Radial Edge Sizing 1 (Top Half)
(Right Click) Mesh > Insert > Sizing
Set Geometry to the top half of the bisecting line. Set Type to Number of Divisions, set Number of Divisions to 96 and set Behavior to Hard. Then, set Bias Type to the first option and set Bias Factor to 460. These selections are shown in the image below.

Radial Edge Sizing 2 (Bottom Half)
(Right Click) Mesh > Insert > Sizing
Set Geometry to the top half of the bisecting line. Set Type to Number of Divisions, set Number of Divisions to 96 and set Behavior to Hard. Then, set Bias Type to the second option and set Bias Factor to 460. These selections are shown in the image below.

Then, click Update to generate the new mesh. You should obtain the mesh, that is shown below.

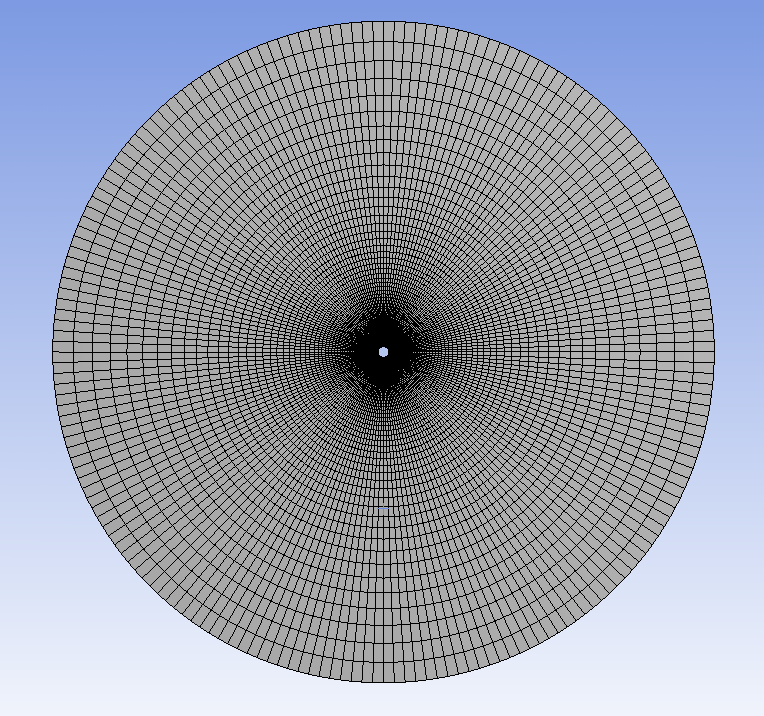
Verify Mesh Size
(Click) Mesh > (Expand) Statistics
You should have 18,624 nodes and 18,432 elements.
Go to Step 4: Setup (Physics)
See and rate the complete Learning Module
Go to all FLUENT Learning Modules