 Sign-up for free online course on ANSYS simulations!
Author: Rajesh Bhaskaran & Yong Sheng Khoo, Cornell University
Problem Specification
1. Create Geometry in GAMBIT
2. Mesh Geometry in GAMBIT
3. Specify Boundary Types in GAMBIT
4. Set Up Problem in FLUENT
5. Solve!
6. Analyze Results
7. Refine Mesh
Step 5: Solve!
Set Solution Controls
Main Menu > Solve > Controls > Solution...
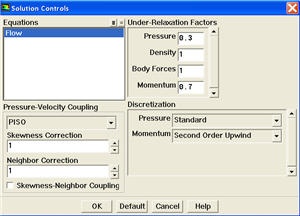
Select PISO from the Pressure-Velocity Coupling drop-down list.
PISO allows the use of higher time step size without affecting the stability of the solution. Hence it is recommended pressure-velocity coupling for solving transient applications.
Uncheck Skewnes-Neighbor Coupling.
Select Second Order Upwind from the Momentum drop-down list in the Discretization group box. Click OK to close the Solution Controls panel.
Set Initial Guess
Initialize the flow field to the values at the inlet:
Main Menu > Solve > Initialize > Initialize...
In the Solution Initialization menu that comes up, choose inlet under Compute From. The X Velocity for all cells will be set to 1 m/s, the Y Velocity to 0 m/s and the Gauge Pressure to 0 Pa. These values have been taken from the inlet boundary condition.
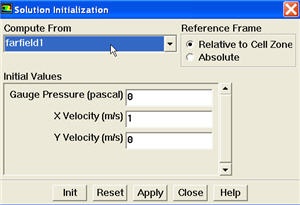
Click Init. This completes the initialization. Close the window.
Patch Region
We will patch the upper region downstream of the flow to create asymmetry so that we can obtain stable shedding frequency faster.