 Sign-up for free online course on ANSYS simulations!
| Include Page | ||||
|---|---|---|---|---|
|
If your simulation requires more processing power, you may need to remotely run the calculations on a larger server. This tutorial is for those who have log-in access to the SimCafe1 server on Cornell University's Ithaca campus. The procedure for running FLUENT on other servers will be similar.
Method 1: Remote Desktop Connection
- If you are connecting to the server outside of the campus, first establish a VPN connection to the Cornell network. For guidelines for setting up the VPN network, refer to THIS LINK and follow the given steps.
- In the Start menu, type "Remote Desktop Connection" and hit enter. Input the information below:
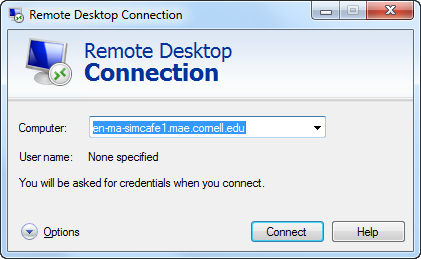
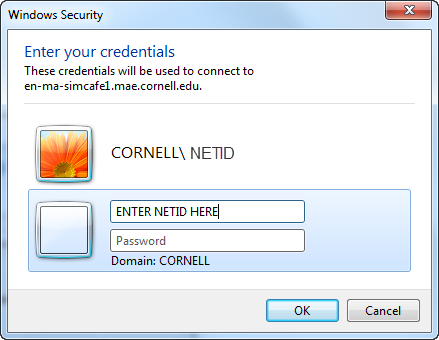
- Hit OK and you should be able to access the server smoothly.
- You can transfer files between the remote server and your local machine through drag-and-drop by mapping a network drive. See the instructions below for mapping a network drive.
Note: Some users may find that the default Remote Desktop app in Windows does not work properly. If this happens to you, try using this alternative with the same procedure.
Method 2: Using server as a network drive
Instructions are provided in the following video and summarized below:
| HTML |
|---|
<iframe width="640" height="360" src="//www.youtube.com/embed/U3o8T6mYoiM?rel=0" frameborder="0" allowfullscreen></iframe> |
Summary of the video above:
- Append DNS suffix
- Go to Control Panel >> Network and Sharing Center >> Local Area Connection (or Wi-Fi if you don't have a hard connection)
- Click Properties in the “Status” window
- Select Internet Protocol Version 4 (TCP/IPv4)
- Click Properties >> Advanced
- Go to the “DNS” tab and under the window “Append these DNS suffixes”, click Add
- In the “TCP/IP Domain Suffix” window, type in: mae.cornell.edu
- Hit "OK" and "Close" until you return to your desktop
- Map Network drive
- Go to “My Computer” and select “Map network drive” on the top bar
- For “Folder”, type in: \\en-ma-simcafe1\workspace
- Click “Finish” and make note of the drive letter used (e.g., ‘Z:’)
- If it prompts you for login information, use your netID@cornell.edu and password.
- Set up FLUENT
- Select “Parallel”
- Select “Use Job Scheduler”
- Choose # of processes. (Note that the academic version of FLUENT is limited to 2 processes.)
- Under "More Options" in the “General Options” tab
- For working directory, type in the name of mapped drive (e.g., ‘Z:\’)
- If this is grayed out and does not have the correct drive, follow these instructions:
- Find the Workbench shortcut (or the Fluent shortcut if you run Fluent directly instead of through Workbench)
- Right-click and select "Properties"
- Change "Start In" to the location of the mapped drive
- If this is grayed out and does not have the correct drive, follow these instructions:
- For “Fluent Root Path”, enter: \\en-ma-simcafe1\fluent
- For working directory, type in the name of mapped drive (e.g., ‘Z:\’)
- Under the “Scheduler” tab
- For Computer Cluster Head Node Name, enter: en-ma-simcafe1.mae.cornell.edu
- If you are using a UDF, check “Setup Compilation Environment for UDF” under the “Environment” tab
- Click OK to run FLUENT
- In the print-out console, make sure all licenses are available and simulation is running
- Check progress of Fluent solver
- Check that HPC Cluster Manager is installed on the computer
- Run HPC Job Manager
- Select "active" on the left tab to view active jobs
Running Fluent on a remote server
...
1. Buy and install
(~$80).
Make sure to check the
. We highly recommend that your computer has at least 4GB of RAM and 20GB of free hard disk space.
While your Apple computer already has a software called BootCamp to install Windows on your Mac, it requires the user to reboot each time he or she wants to switch operating systems. The user also has to play with disk partitioning which makes the setup more complicated. We highly recommend using Parallels Desktop for its ease of use and flexibility. This software allows the user to run Mac OSX and Windows side by side and it does not require hard drive partitioning. Windows simply acts as an application that you can run or close as you wish. All the Windows files are contained in one master file (a .pvm file) that you can move wherever you want, even on an external hard rive.
2. Get yourself a copy of Windows 7 or Windows 8 (installation CD or ISO file).
Windows 8.1 Pro for Students is
and is the best deal available to students and teachers at only $70. It is accessible as an ISO file to download. Select the 64 bit version (X64) when prompted.
3. Run Parallels Desktop 9 and follow the on-screen instructions to install Windows.
If you downloaded Windows as an ISO file, you will simply be asked to drag and drop the ISO file in the box to proceed with the installation process. If you have the Windows installation CD, then simply insert it in the drive when prompted. We suggest that you choose to use Windows "like a PC". Feel free to follow this
if you need.
4. Buy and install the ANSYS Student Version.
ANSYS offers a student version of their software for only $25/year. It is available on the ANSYS Student Portal. The functionalities are the same as in the full version except that it is node restricted to 32,000 (more than enough for what a typical student will need). Please ask Sebastien at sfl32@cornell.edu for information on how to get the ANSYS Student Version.
Note: This is release 15.0 which is a newer release than the ones installed in the Cornell computer labs (14.5). Just be aware that a project created in 15.0 will not open in 14.5 while a project created in 14.5 can be opened in 15.0.
...