 Sign-up for free online course on ANSYS simulations!
...
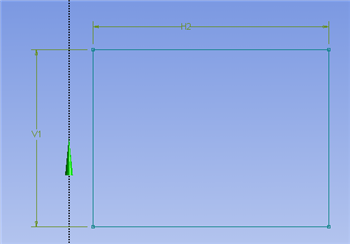
The dimensions of the rectangle will now be inputted into ANSYS. First, click on the Dimensions tab,  . Next, click on the left vertical line of your rectangle, move the mouse to the left then click again. Then click on the top horizontal line of your rectangle, move the mouse up and click again. Your screen should now look similar to the image below.
| newwindow | ||||
|---|---|---|---|---|
| ||||
https://confluence.cornell.edu/download/attachments/146918511/dim_Full.png |
Next, set V1 to 2 and set H2 to 1 as shown below.
| newwindow | ||||
|---|---|---|---|---|
| ||||
https://confluence.cornell.edu/download/attachments/146918511/dims_Full.png |
Dimension the rectangle as shown in the image below.
...
https://confluence.cornell.edu/download/attachments/129171767/Dimensioning_Full.png...
https://confluence.cornell.edu/download/attachments/129171767/SpecDimension_Full.png...
...
Surface Body Creation
Here, the rectangle will be turned into a surface. First, click on the Modeling tab,  . Next, (Click)Concept > Surface From Sketches, as shown below.
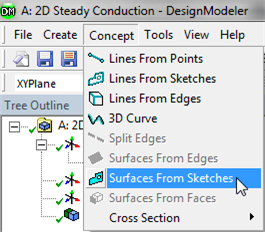
T o . To do so (Click)Concept > Surface From Sketches. Next, highlight all four edges of the rectangle and select Apply in the "Details of SurfaceSK1" table. Now, click the generate button, , in order to create the surface.
...