 Sign-up for free online course on ANSYS simulations!
| Include Page | ||||
|---|---|---|---|---|
|
| Include Page | ||||
|---|---|---|---|---|
|
Mesh
Specify Material
Open ANSYS Mechanical by double clicking Model. First, we will tell ANSYS which material we are using for the simulation. Expand Geometry, and click Surface Body in the Outline window. In the Details window, select Material > Assignment > Al 6061-T6. The material has now been specified.
Body Sizing
In the outline window, click on  . The only thing we will control for this geometry's mesh is the size of the elements. Go to Mesh Control > Sizing to open up the Sizing menu. Select the entire geometry by clicking Body Selection Filter
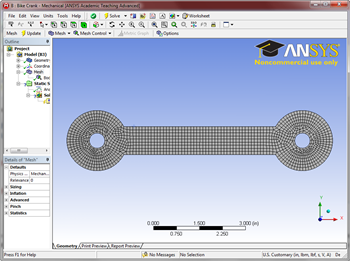
  then selecting clicking on the bike crankmodel. Now click Geometry > Apply. Also, change the size of the mesh from default to 0.1 in. (If the units are not in inches, change them by going to Units > U.S. Customary (in, lbm, lbf, F, S, V, A)). Now, generate the mesh by clicking Mesh > Generate Mesh. The final result should look something like this:
Construction Geometry
Now that the mesh has been created we can begin specifying the boundary conditions for the simulation.
Continue to Step 4: Setup (Physics)
Go to all ANSYS Learning Modules
See and rate the complete Learning ModuleThe next thing we are going to do is to set up a path where the strain gauge lies on the bike crank. In the outline window, click  . Next, go to Construction Geometry > Path. This will open up the path toolbox in the details window. Creating a path in Workbech is very easy: you just have to specify the starting and ending points of your path and workbench will create it. In the details window, enter (3.3748,-.29094,.375) as the starting point and (3.3748,.10276,.375) as the end point. Change the number of sampling points to 50.