 Sign-up for free online course on ANSYS simulations!
...
To begin the Mesh process, click Mesh in the outline window. This will bring up the Mesh Menu bar in the Menu bar.

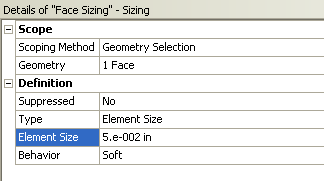
We want to control the size of the elements in the mesh for this problem; to accomplish this, click Mesh Control > Sizing. We now need to pick the geometry we are going to mesh. Click the face of the geometry to select it, then in the details view window click Geometry > Apply. Now, we can set some of the details of our mesh. Select Element Size > Default, this will allow you to change the size of the element. Choose the size of the elements to be .05.
Now, we want to refine the mesh by the hole, where we expect a stress concentration. Go to Mesh Control > Refinement. This will open the Refinement menu if the details view window. To select the hole as the geometry for refinement, make sure the edge select tool is selected from the menu toolbar.  Now, select the hole's edge then click Geometry > Apply.

In the details window, change the Refinement parameter from 1 to 3, this will give us the finest mesh at the hole which will improve accuracy of the simulation.
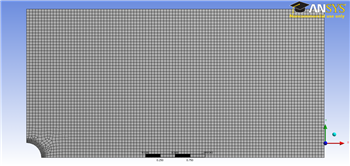
Now that we have our mesh setup, click Mesh > Generate Mesh. This will create the mesh to our specifications and . Click Mesh to display it. It should look something like this:
Click here to enlarge the image
Now that the mesh has been created, we are ready to specify the boundary conditions of the problem.
...