 Sign-up for free online course on ANSYS simulations!
...
| Panel |
|---|
Author: Daniel Kantor and Andrew Einstein, Cornell University Problem Specification |
...
Go to the Start menu and open GAMBIT. When the Startup window appears, type "C:\Documents and Settings\ (your username)\Desktop\sphere" for working directory. Under options, add "-id sphere wakesinglesphere".
Under Main Menu, select Solver > FLUENT 5/6 since the mesh to be created is to be used in FLUENT 6.0.
...
Operation Toolpad > Geometry Command Button  * > Volume Command Button*
  * > Move/Copy Volumes * Volumes
We wish to physically move all three volumes so click the 'move' option and choose 'translational' for Operation. Select flow_domain and move it to global coordinates x = 30, y = z = 0.
...
Operation Toolpad > Geometry Command Button * > Volume Command Button* > Split Volumes 
A split operation takes one volume and uses another shape, which intersects the first in some way, to divide it into two distinct volumes. The volume we want to do the split on is flow_domain. The setting 'Volumes (Real)' means that Gambit will use a second volume as the tool to define the portion of flow_domain to be separated from the greater whole. Select sphere_box as the splitting tool. Check the options "Bidirectional" and "Connected." As the name suggests, "Connected" keeps the two resulting volumes linked. Each volume can be selected separately but they will use the same faces (i.e. the faces that compose the sides of sphere_box) to define their borders, meaning that mesh cell intervals must be consistent for two volumes that share a face. "Bidirectional" preserves the entire volume used as the splitting tool, regardless of how much of the splitting tool volume intersects the target volume.

...
Operation Toolpad > Geometry Command Button * > Volume Command Button* * > Boolean Operations * Operations 
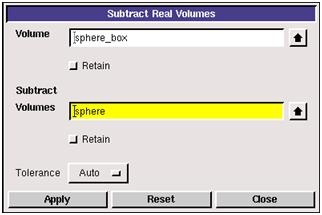
Right click and select 'Subtract Real Volumes.' Similar to the split command, subtract uses one volume to remove a portion of another volume. The difference is that subtract doesn't create two volumes in place of one. Instead the removed portion is deleted. Select sphere_box as the volume we want to subtract from. Choose sphere as the volume we want to subtract with.
...
Operation Toolpad > Geometry Command Button * > Volume Command Button* * > Create Volume Real Cylinder* 
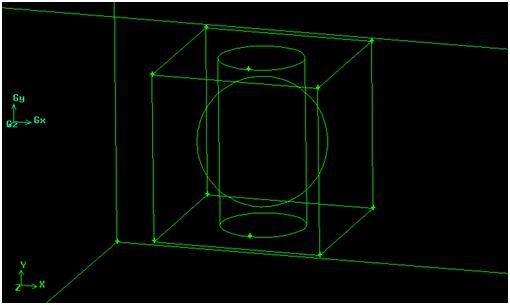
Right click on the "Create Volume" button and select "Cylinder." Create a cylindrical volume with height 8 and radius 2, orient it along the centered y-axis, and label it cylinder. The cylinder height must be the same as the length of sphere_box and the cylinder radius must be smaller than the sphere radius. Note: you cannot choose a cylinder radius of 1 because the resulting volume will be too small for our intended meshing. move it to x = 12, y = z = 0.
...
Operation Toolpad > Geometry Command Button * > Volume Command Button * Button* > Move/Copy Volumes*
Go to the Move command window and move cylinder to global coordinates x = 12, y = z = 0 so that it is centered at the same point as the sphere.
...
Operation Toolpad > Geometry Command Button * > Volume Command Button* * > Split Volumes * Volumes
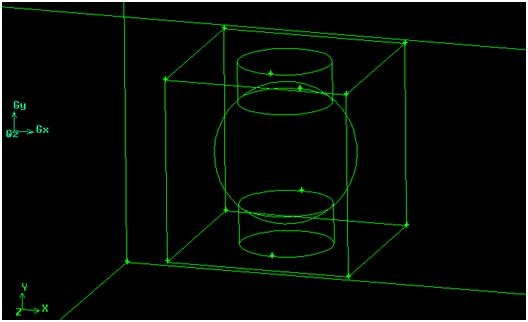
Go to the Split command window and select sphere_box as the volume to be split and select cylinder as the splitting tool. This time only select the "Connected" option. Remember that "Bidirectional" preserves the original splitting tool and that, by this point, only the region outside of the sphere counts as sphere_box's internal volume. Most of the cylinder is within the region defined as our sphere, our solid sphere, where we have no need or use for it.
...
Operation Toolpad > Geometry Command Button * > Volume Command Button* * > Modify Volume Color/Label * Label 
Right click and select "Modify Label." There now four defined volumes. Notice that the cylinder label is still used by one of the two cylindrical caps we just created. Select the other small cylinder, which bears a default Gambit-provided number tag, and label it cap. This will prove helpful later during meshing, when we will need to be able to easily select these cylindrical pieces from a large list of volumes.
...
Operation Toolpad > Geometry Command Button * > Edge Command Button*  * > Create Edge * Edge
The simplest option is to create a diagonal face that is aligned parallel to the cylindrical caps. First create a pair of edges using sphere_box vertices. Hold down 'Shift' and left-click on two, diagonally-opposite vertices on the positive y-axis side of sphere_box. Label the new edge Line1.
...
Operation Toolpad > Geometry Command Button * > Face Command Button*  * > Form Face*
Change to the Face Command options and open the Form Face window. This enables you to create a face from a wireframe pattern of edges. Again old down 'Shift' and left-click on Line1 and Line2 and the two vertical edges that link Line1 and Line2. Label the new face slice.
...
Operation Toolpad > Geometry Command Button * > Volume Command Button* * > Split Volumes * Volumes
This time we will use a face to split a volume, effectively cutting the volume in half. Select sphere_box as the volume to be split. For "Split With", choose "Faces (Real)" and select slice1 as the splitting tool. As before, when performing the split with the cylinder, click only the "Connected" option since we only need slice1 for one operation.
...
Operation Toolpad > Geometry Command Button > Volume Command Button > *Modify Volume Color/Label * Label 
Select the only generic volume name in the list and label it diag_box so it can be easily recognized later. Your sphere should now be composed of four distinct volumes.
...
Operation Toolpad > Geometry Command Button > Face Command Button > Move/Copy Faces 
We will create some new faces by making copies of existing faces. Go to the Move/Copy Faces command window. The six faces that compose the exterior of volume flow_domain have the right dimensions to aid us. Each of those six faces needs to be copied and moved inward so that all six copy faces border the sphere box.
...
Operation Toolpad > Geometry Command Button > Volume Command Button > Split Volumes
With the copied faces in position, it's time for one final volume split. Go to the Volume Split command window. Select flow_domain as the volume to be split and choose to split with real faces. Now left click on the text field where you select what faces you want to use to split (the text field will highlight yellow). Hold down 'Shift' and use the mouse to click on the six copied faces bordering the sphere box (the copied faces will have light-blue borders). You can only split one volume at a time, but Gambit does allow you to split that one volume with multiple elements. Therefore the entire flow domain can be segmented in one split command. Because of this, only the "Connected" option needs to be checked.
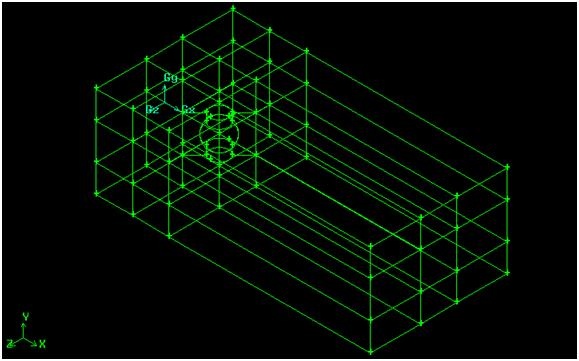
This should divide the flow domain into twenty-six, empty rectangular segments plus the box containing the sphere.
Wiki Markup Wiki Markup
Go to all FLUENT Learning Modules
| Code Block |
|---|