 Sign-up for free online course on ANSYS simulations!
...
The instructions for the second server Simcafe2 are the same as for Simcafe1. Just change every instance of Simcafe1 to Simcafe2. It is an extra option for running the simulations.
...
Method 1: Remote Desktop Connection, only works for Windows PCs
- If you are connecting to the server outside of the campus, first establish a VPN connection to the Cornell network. For guidelines for setting up the VPN network, refer to THIS LINK and follow the given steps.
Map to a network drive on the server. Follow the steps below, under (2. Map Network Drive). Create a folder named with you NETID, and move your simulation files under that folder. Be sure to have all you simulation files in your own folder, and please do not make a mess in the common space. - In your computer, under "Accessories", find and open In the Start menu, type "Remote Desktop Connection" and hit enter. Input the information below:
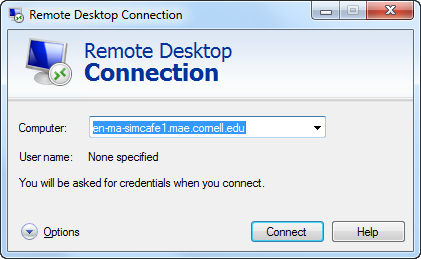
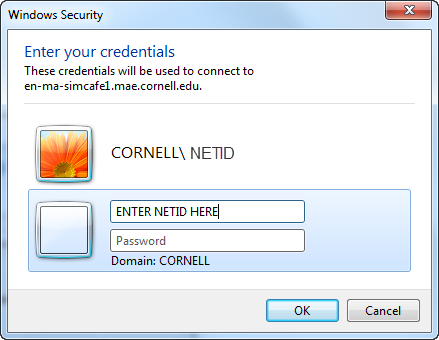
- Hit OK and you should be able to access the server smoothly.
Note: Some users may find that the default Remote Desktop app in Windows does not work properly. If this happens to you, try using this alternative with the same procedure.
Method 2: Using server as a network drive
...
- Append DNS suffix
- Go to Control Panel >> Network and Sharing Center >> Local Area Connection (or Wi-Fi if you don't have a hard connection)
- Click Properties in the “Status” window
- Select Internet Protocol Version 4 (TCP/IPv4)
- Click Properties >> Advanced
- Go to the “DNS” tab and under the window “Append these DNS suffixes”, click Add
- In the “TCP/IP Domain Suffix” window, type in: mae.cornell.edu
- Hit "OK" and "Close" until you return to your desktop
- Map Network drive
- Go to “My Computer” and select “Map network drive” on the top bar
- For “Folder”, type in: \\en-ma-simcafe1\workspace
- Click “Finish” and make note of the drive letter used (e.g., ‘Z:’)
- If it prompts you for login information, use your netID@cornell.edu and password.
- Set up FLUENT
- Select “Parallel”
- Select “Use Job Scheduler”
- Choose # of processes. (Note that the academic version of FLUENT is limited to 2 processes.)
- Under "More Options" in the “General Options” tab
- For working directory, type in the name of mapped drive (e.g., ‘Z:\’)
- If this is grayed out and does not have the correct drive, follow these instructions:
- Find the Workbench shortcut (or the Fluent shortcut if you run Fluent directly instead of through Workbench)
- Right-click and select "Properties"
- Change "Start In" to the location of the mapped drive
- If this is grayed out and does not have the correct drive, follow these instructions:
- For “Fluent Root Path”, enter: \\en-ma-simcafe1\fluent
- For working directory, type in the name of mapped drive (e.g., ‘Z:\’)
- Under the “Scheduler” tab
- For Computer Cluster Head Node Name, enter: en-ma-simcafe1.mae.cornell.edu
- If you are using a UDF, check “Setup Compilation Environment for UDF” under the “Environment” tab
- Click OK to run FLUENT
- In the print-out console, make sure all licenses are available and simulation is running
- Check progress of Fluent solver
- Check that HPC Cluster Manager is installed on the computer
- Run HPC Job Manager
- Select "active" on the left tab to view active jobs