search
attachments
weblink
advanced
Overview
Content Tools
Today is a clean hands day. We left the erg alone, and tried working with the videos we took. I'm currently trying to convert the camcorder's .MTS files into .MOV or .ATV or .MP4 so that we can open the files using the Tracker software.
EDIT: Lily and Steven have done the file conversions. They are in Box, under Photos & Videos, under 2013.06.26 Rowing Filming
We charmed the front desk at Teagle into opening up the rowing room in order to film Andrea rowing on slides and the dynamic erg. We have video of Andrea rowing on:
- our erg
- C2 stationary
- C2 on slides
- C2 dynamic
I don't have enough experience to distinguish between the slides and the dynamic, but a stationary erg definitely feels different and less smooth than the non-stationary ergs.
Dynamic:
Slides:
The videos are on Box. We plan to analyze them with the Tracker software.
We will probably redo the videos with an experienced rower.
Wendy Davis is a political beast, and thank you SCOTUS.
Excess slack in the bicycle chain sometimes leads to the chain falling the sprocket.
Ordered fifteen #25 connecting links from McMaster. Filled out reimbursement form for threaded rods from Lowe's.
Took the erg outside, passively showing it off to people passing through the Engineering Quad.
Steven took video of Andrea rowing. We placed green dots on the seat, the handle, and the footboard. Steven says the resolution may not have been high enough to see the dots, but we will have to re-record a video anyway with a varsity rower.
Ended the day sweeping up cigarette butts.
- Bought single speed master link. Gary from the Bike Rack in collegetown says single-speed chains are the widest, so we should generally be OK using a single-speed chain for our erg.
- Got three feet each of 8-32, 1/4"-20, and 10-24 threaded rod. Need nuts for them too. We have bolt cutters in the lab, so no need to go to Emerson to chop em up.
- Took off bottom bar and put the handle bungee and chain inside of the top bar so it resembles the original erg in having only one bar. The handle bungee system is upside down, so we have to take it out, reassemble it, and put it back in.

I have to talk to Joe Rogan to:
- get reimbursed for rods
- order parts: connecting links for #25, idler sprocket for wheel (maybe)
Fix the roof hatch at Barton. Snee Hall rooftop is open to public. ROTC rooms in Barton are sometimes open.
We re-fixed the handle sprocket on the differential. Before, the sprocket was not parallel to the differential gear because of uneven spacing among the four bolts connecting the differential gear to the sprocket. We solved the problem by
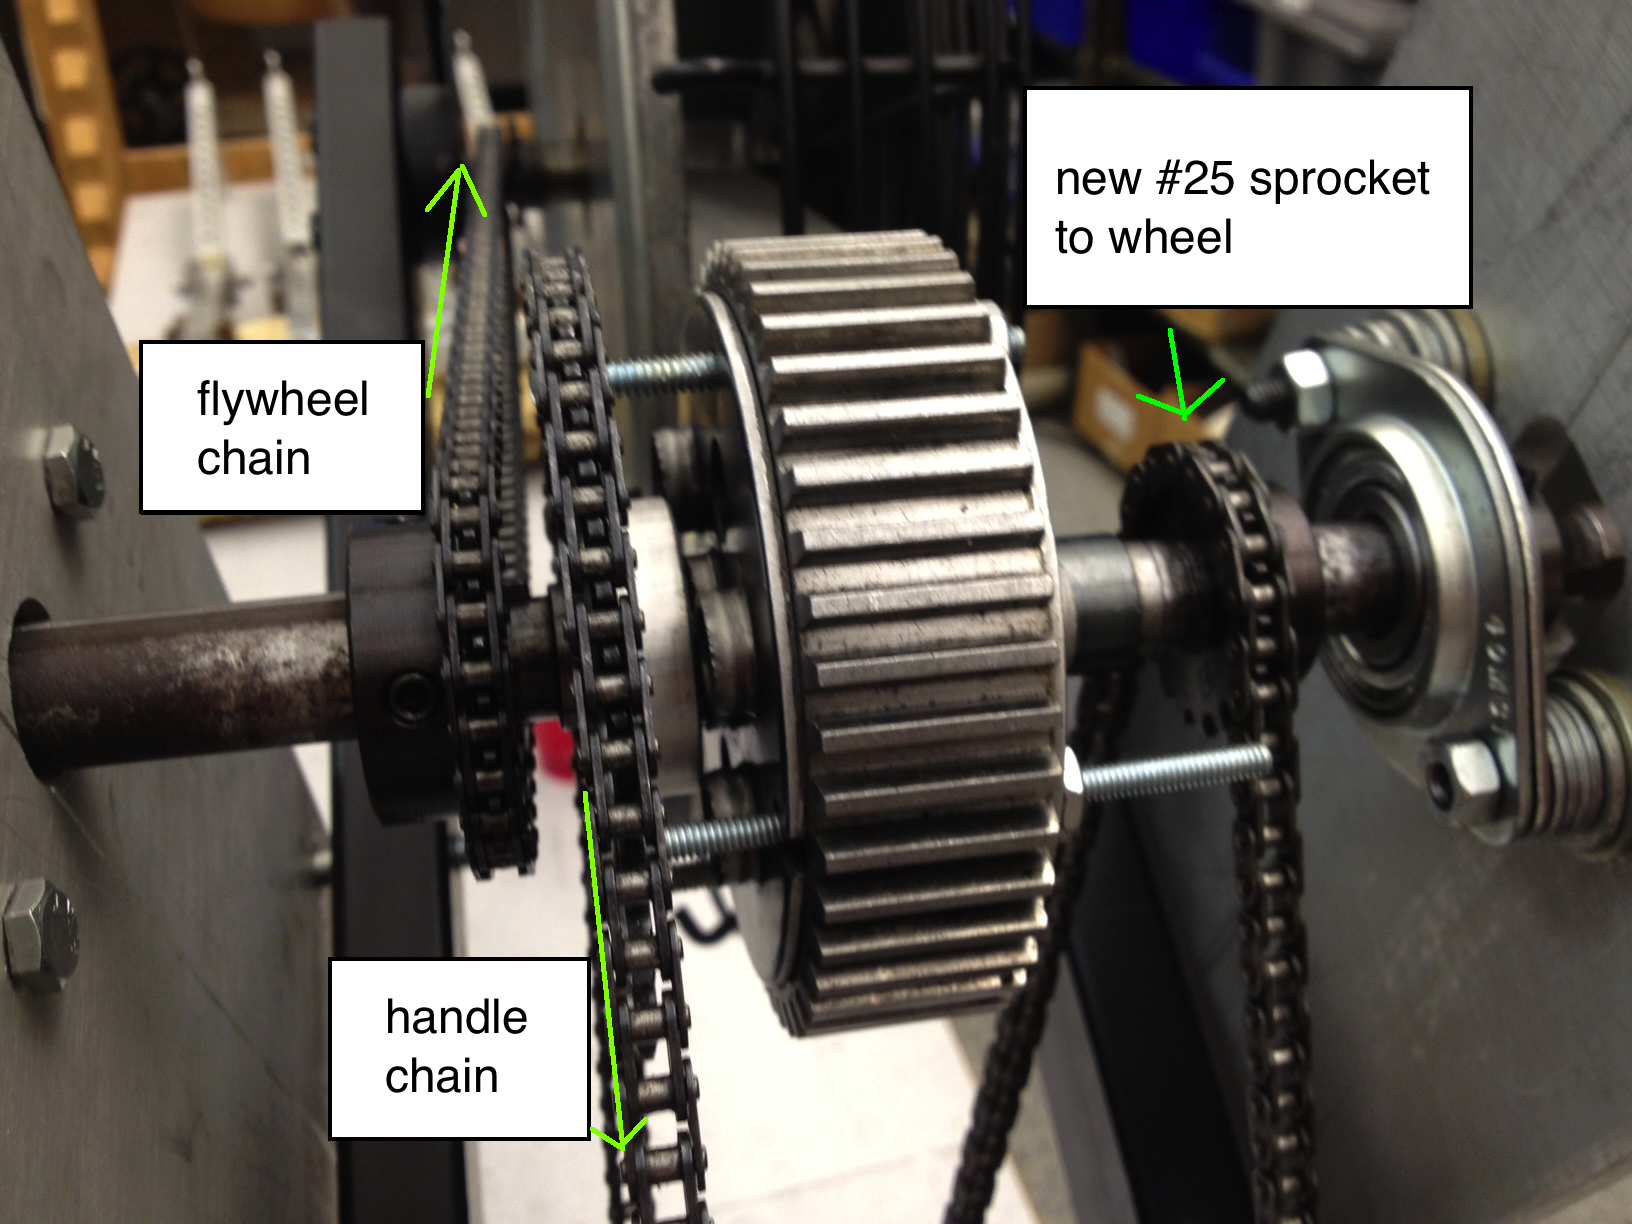
The flywheel chain had been so loose that it was sagging and hitting itself, so we shortened the flywheel chain to remove the slack.
Rowing on the erg produces less clattering noise now.
The high-force bungee cord and bicycle chain were not perpendicular to the sprocket, so the bungee cord exerts a high force at an angle to the sprocket. The lateral pressure popped a plate off of the bicycle chain. We need a connecting link to piece the chain back together.
Things to do tomorrow:
- get connecting link, i.e. master link, from Bike Rack
- finish ordering connecting links from []
- return weights to room 301
The fire-escape on the side of Bard Hall is pretty sweet, and it grants access to the roof of Thurston and maybe the other buildings connected to Thurston.
For the past couple of days, we've been reassembling the erg according to 2013.06.03 System Setup Diagram.png. The erg now looks like:
2013.06.13 Differential photo with label.png
2013.06.13 wheelaxlesetup.jpg
Wednesday
- We got 3/16" (thick and wide) keyways cut into the flywheel and lower wheel axle sprockets at Emerson. Joe showed us how to use the broaching tool to do this. These keyways are necessary to keep the sprockets on the axle without slipping (with the help of allen keys as well).
- We also had to shorten some screws that held together the differential, using the screw cutting tool from Emerson. This was mainly for conservation of space.
- One of the wheels was not screwing well into the wheel axle. We figured that a part of the wheel axle thread was damaged. Since the axle jutted out too much anyway, we decided to use the horizontal band saw in Emerson to cut off about 1" of the axle. After that, the wheel screwed on smoothly.
Thursday
- We worked on attaching the bungees in place. The bungee attached to the wheel axle (B2 in the 2013.06.03 diagram) was given a pretension of about 5".
- Attaching master links to the chains were quite difficult. We spent over 45 mins trying to attach them to the chains, without great success. In the end, we concluded that the chain could be kept taut and functional without the u-shaped clip. There must be an easier and more effective way to do this. Hmm...
- The erg worked! The recovery still needs to be worked on, but here is the footage of Andrea rowing on the erg, before the chains broke:
2013.06.13 Andrea Rowing
> The erg moves a lot more smoothly and easier than before due to the corrected gear ratios allowing for more power in the wheels.
> The resistance from the B2 bungee feels quite small. This could in large be due to that towards the end, we found that the bungee chain fell off the sprocket and was not affecting the wheels. We left the fix for this for Friday.
> Some strange sounds are made during the drive stroke. We're not quite sure where it's coming from.
> There is great slack on the handlebar chain. Maybe we should shorten it?
> When Lily rowed on the erg, there was major slippage on the drive sprocket when the handle is pulled hard (the one the handlebar wraps around). We're not sure if shortening the chain would solve this problem.
> At first, we thought that the flywheel chain might have been too tight, so added more links to it.
Friday
- We reattached the B2 bungee chain on the sprocket.
- Previous pretension of 5" felt like too much, so we lowered it to 3".
- Slipping of the chains is more obvious now. See video: 2013.06.14 Chain Slippage
- Possible reasons for slip:
> The drive sprocket of the differential is attached to the main casing by screws (the middle area of 2013.06.13 Differential photo with label). The distance between the main casing and the drive sprocket is not constant (the sprockets are not perfectly parallel). The slanted drive sprocket tilts the path of the chain sometimes?
> The chain is not in contact enough (a little less than half of the sprocket) with the drive sprocket enough due to the angle of the pulley and gear system. The position relationship between the differential and the #9 roller in 2013.06.13 wheelaxlesetup (S1b in 2013.06.03 System Setup Diagram.png) should be the same as before, but perhaps we made a slight discrepancy during reassembly? 
> The wheels are still delayed after pulling on the handlebars. Delayed reactions cause erratic movements?
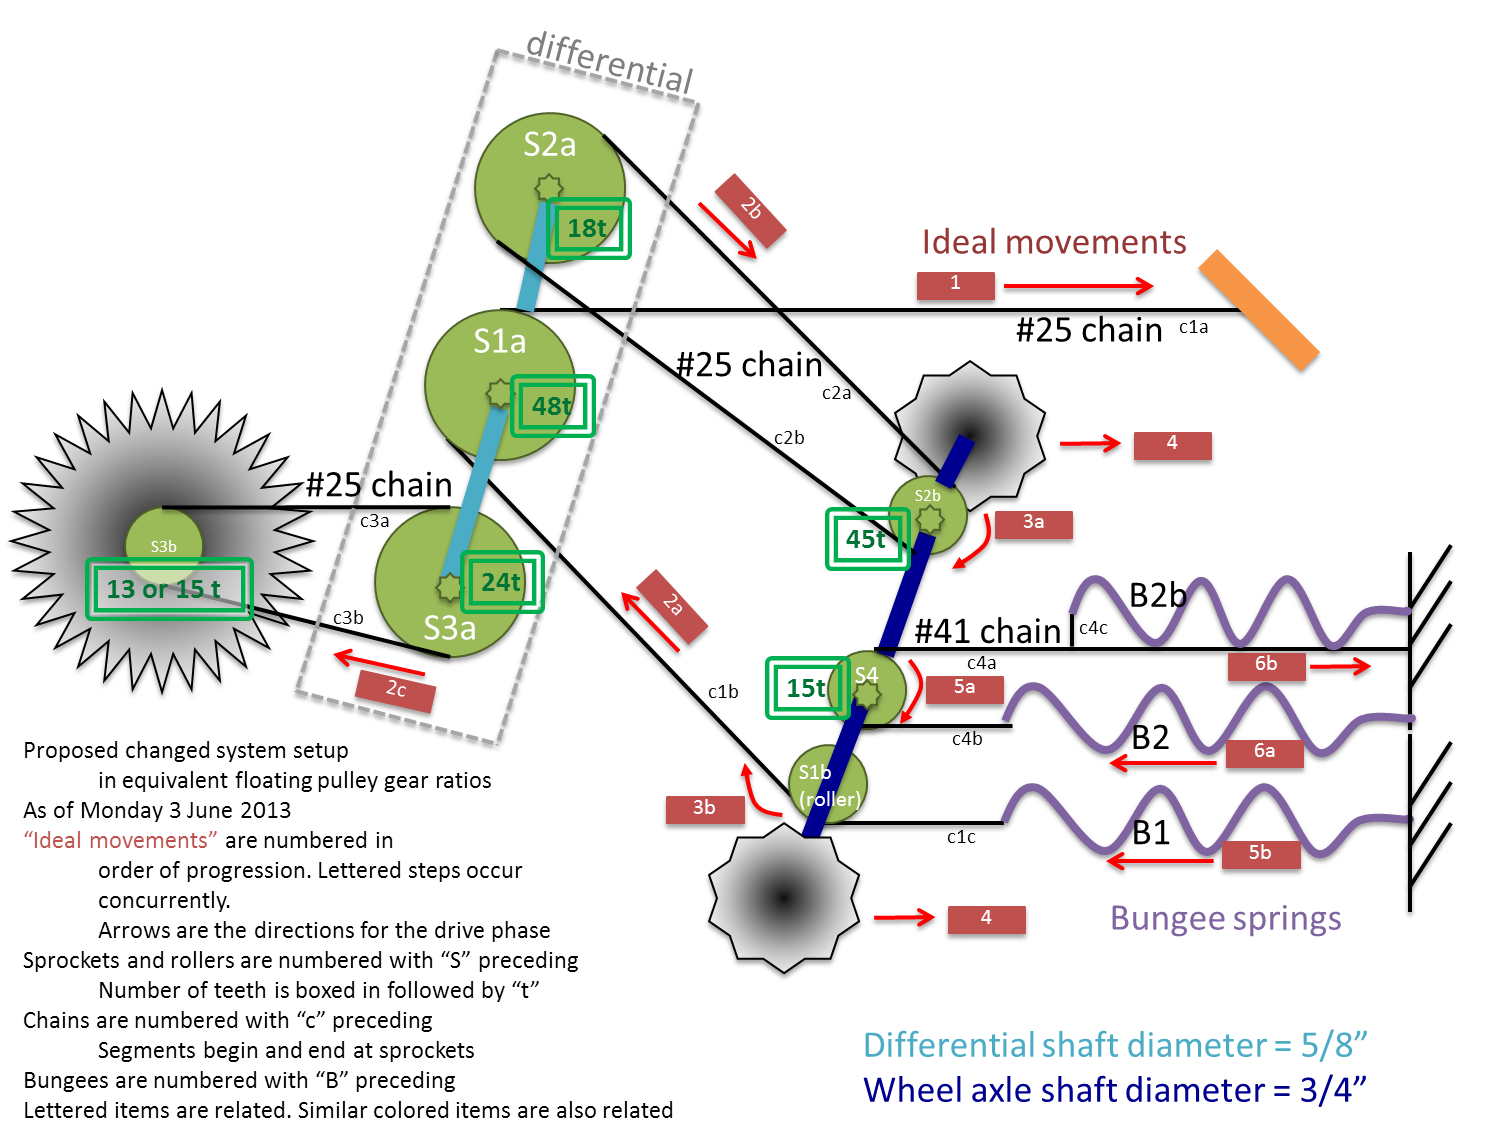
Joe the Machine Shop Guy used a broach set and press to cut out keyways in two of our sprockets. We placed these new sprockets on the differential and on the wheel axle, and all the chains on the differential are all set up. Now, the differential uses only type #25 chain.
The differential is now set up comme ça:

The wheel axle looks the same, but with different sized chain+sprocket that connects the differential to the wheel. Everything on the wheel axle spins with the same angular velocity; nothing rotates freely or independently of the axle. 
The numbers in the above picture correspond to:
- New #25 chain that connects to a differential half-shaft.
- #25 sprocket, 45 teeth. This sprocket is fixed to the wheel axle because of the keyway (4) and the set screw (3).
- Set screw. There are two of these on the sprocket, and they stop the sprocket from moving laterally along axle.
- 3/16" x 3/16" keypiece and 3/16" x 3/32" keyway. These ensure that the axle rotates with the sprocket and they always have the same angular velocity; i.e. there is no slippage between the sprocket and its axle.
- #40 sprocket. The bungee cord chain runs along this sprocket, so when the erg moves bowards, the sprocket rotates with the wheels and shortens the chain on one side, which stretches the bungee cord. When the bungee cord relaxes, it pulls the erg sternward to return the machine to its starting position. The chain for this sprocket is currently missing.
- A bolt running perpendicularly through the axle and the sprocket's axis fixes the sprocket to the axle.
- A flange nut fixes a wheel to the axle.
- Metal bars and rods that support the handle chain pulley (9).
- Freely rotating pulley for handle chain.
- #25 handle chain. One ends goes around the differential and connects to the handle, and the other end is connected to a soft bungee inside of the bottom bar.
The threads on the end of the wheel axle were wearing down, and we couldn't get the wheel nuts screwed on, so we cut off an inch of the axle on both sides.
We still need to attach the bungee cords.
Our parts came in today! See 2013.06.03 System Setup Diagram.png. However, we realized that the sprockets still needed keyways to be cut into them. Therefore, we consulted Joe from the machine shop in Emerson about the best way to cut the keyways. He agreed to help us tomorrow morning at 10am to use a special tool to "broach" cut the keyways.
I looked more into the Tracker video tool. We will need to make a measurement of a part of the erg to use as a reference distance in order to accurately track and calculate the distances moved in the rowing videos. Looks like another trip to Teagle!
I began a physical notebook to document the history of the erg project, past work done, approach on design, and notes on readings. I did this because I found although the electronic versions of the research papers were all available on BOX and online, more often, we consulted the 2 binders for the physical copies of the papers. This will be a concise and comprehensive citing of resources that we used, along with references to the online tools like BOX and Confluence that we used to document our work. (If someone else were to pick up the project, they would not know to look at BOX and Confluence for our work... unless they saw a physical document like the notebook to cite these sources.) I setup the BOX folder so that the link is open to anyone who knows the password (rowgometer).
Snail mail came through and delivered:
- #25 sprocket with 3/4" bore and 45 teeth. This goes on the wheel axle.
- #25 sprocket with 5/8" bore and 18 teeth. This goes on the differential axle, and this sprocket shares a chain with the wheel axle sprocket.
- #25 sprocket with 5/8" bore and 24 teeth. This goes on the differential axle, and it shares a chain with the flywheel axle.
The first and third sprockets need to have keyways cut out. Joe at the machine shop in Emerson will help us tomorrow at 10am to broach these keyways.
Reading:
- The WaterRower is a rowing machine that uses liquid water and a spinning paddle as the drag mechanism. Its performance monitors incorrectly calculate distance rowed by simply multiplying the linear displacement of the handle by 5. This means that a rower can increase perceived velocity by rushing the recovery and pulling faster rather than harder.

- A rower's power is proportional to the cube of velocity: Unable to find DVI conversion log file.. For example, rowing at a 2:00 per 500m pace requires twice as much power compared to rowing at a 2:30 pace.
We took off both the differential and wheel axles today in preparation of our new sprockets and chains.
The largest sprocket on the differential for the wheels was a challenge to remove. We didn't want to directly hammer the sprocket and gears to avoid damaging the teeth on them. Thus, we tried everything from wedging wood in between to sandpapering the sides. After much maneuvering, we were able to get all the parts off.
I hope to clean out the dirtied insides and grease/oil the chains and gears some more before assembly tomorrow.
I read further on the physics of rowing. There's quite a lot of resources out there.
Specifically, I was confused by the center of mass/gravity vs center of buoyancy and the metacenter as mentioned in http://www.atm.ox.ac.uk/rowing/physics/basics.html#fig61. I'll look more into other articles on this topic. I think this is an important concept to understand, because if we make the argument that the center of mass stays the same on an erg on slides, we'll need to show how our erg models the movement of the COM for rowing on water.

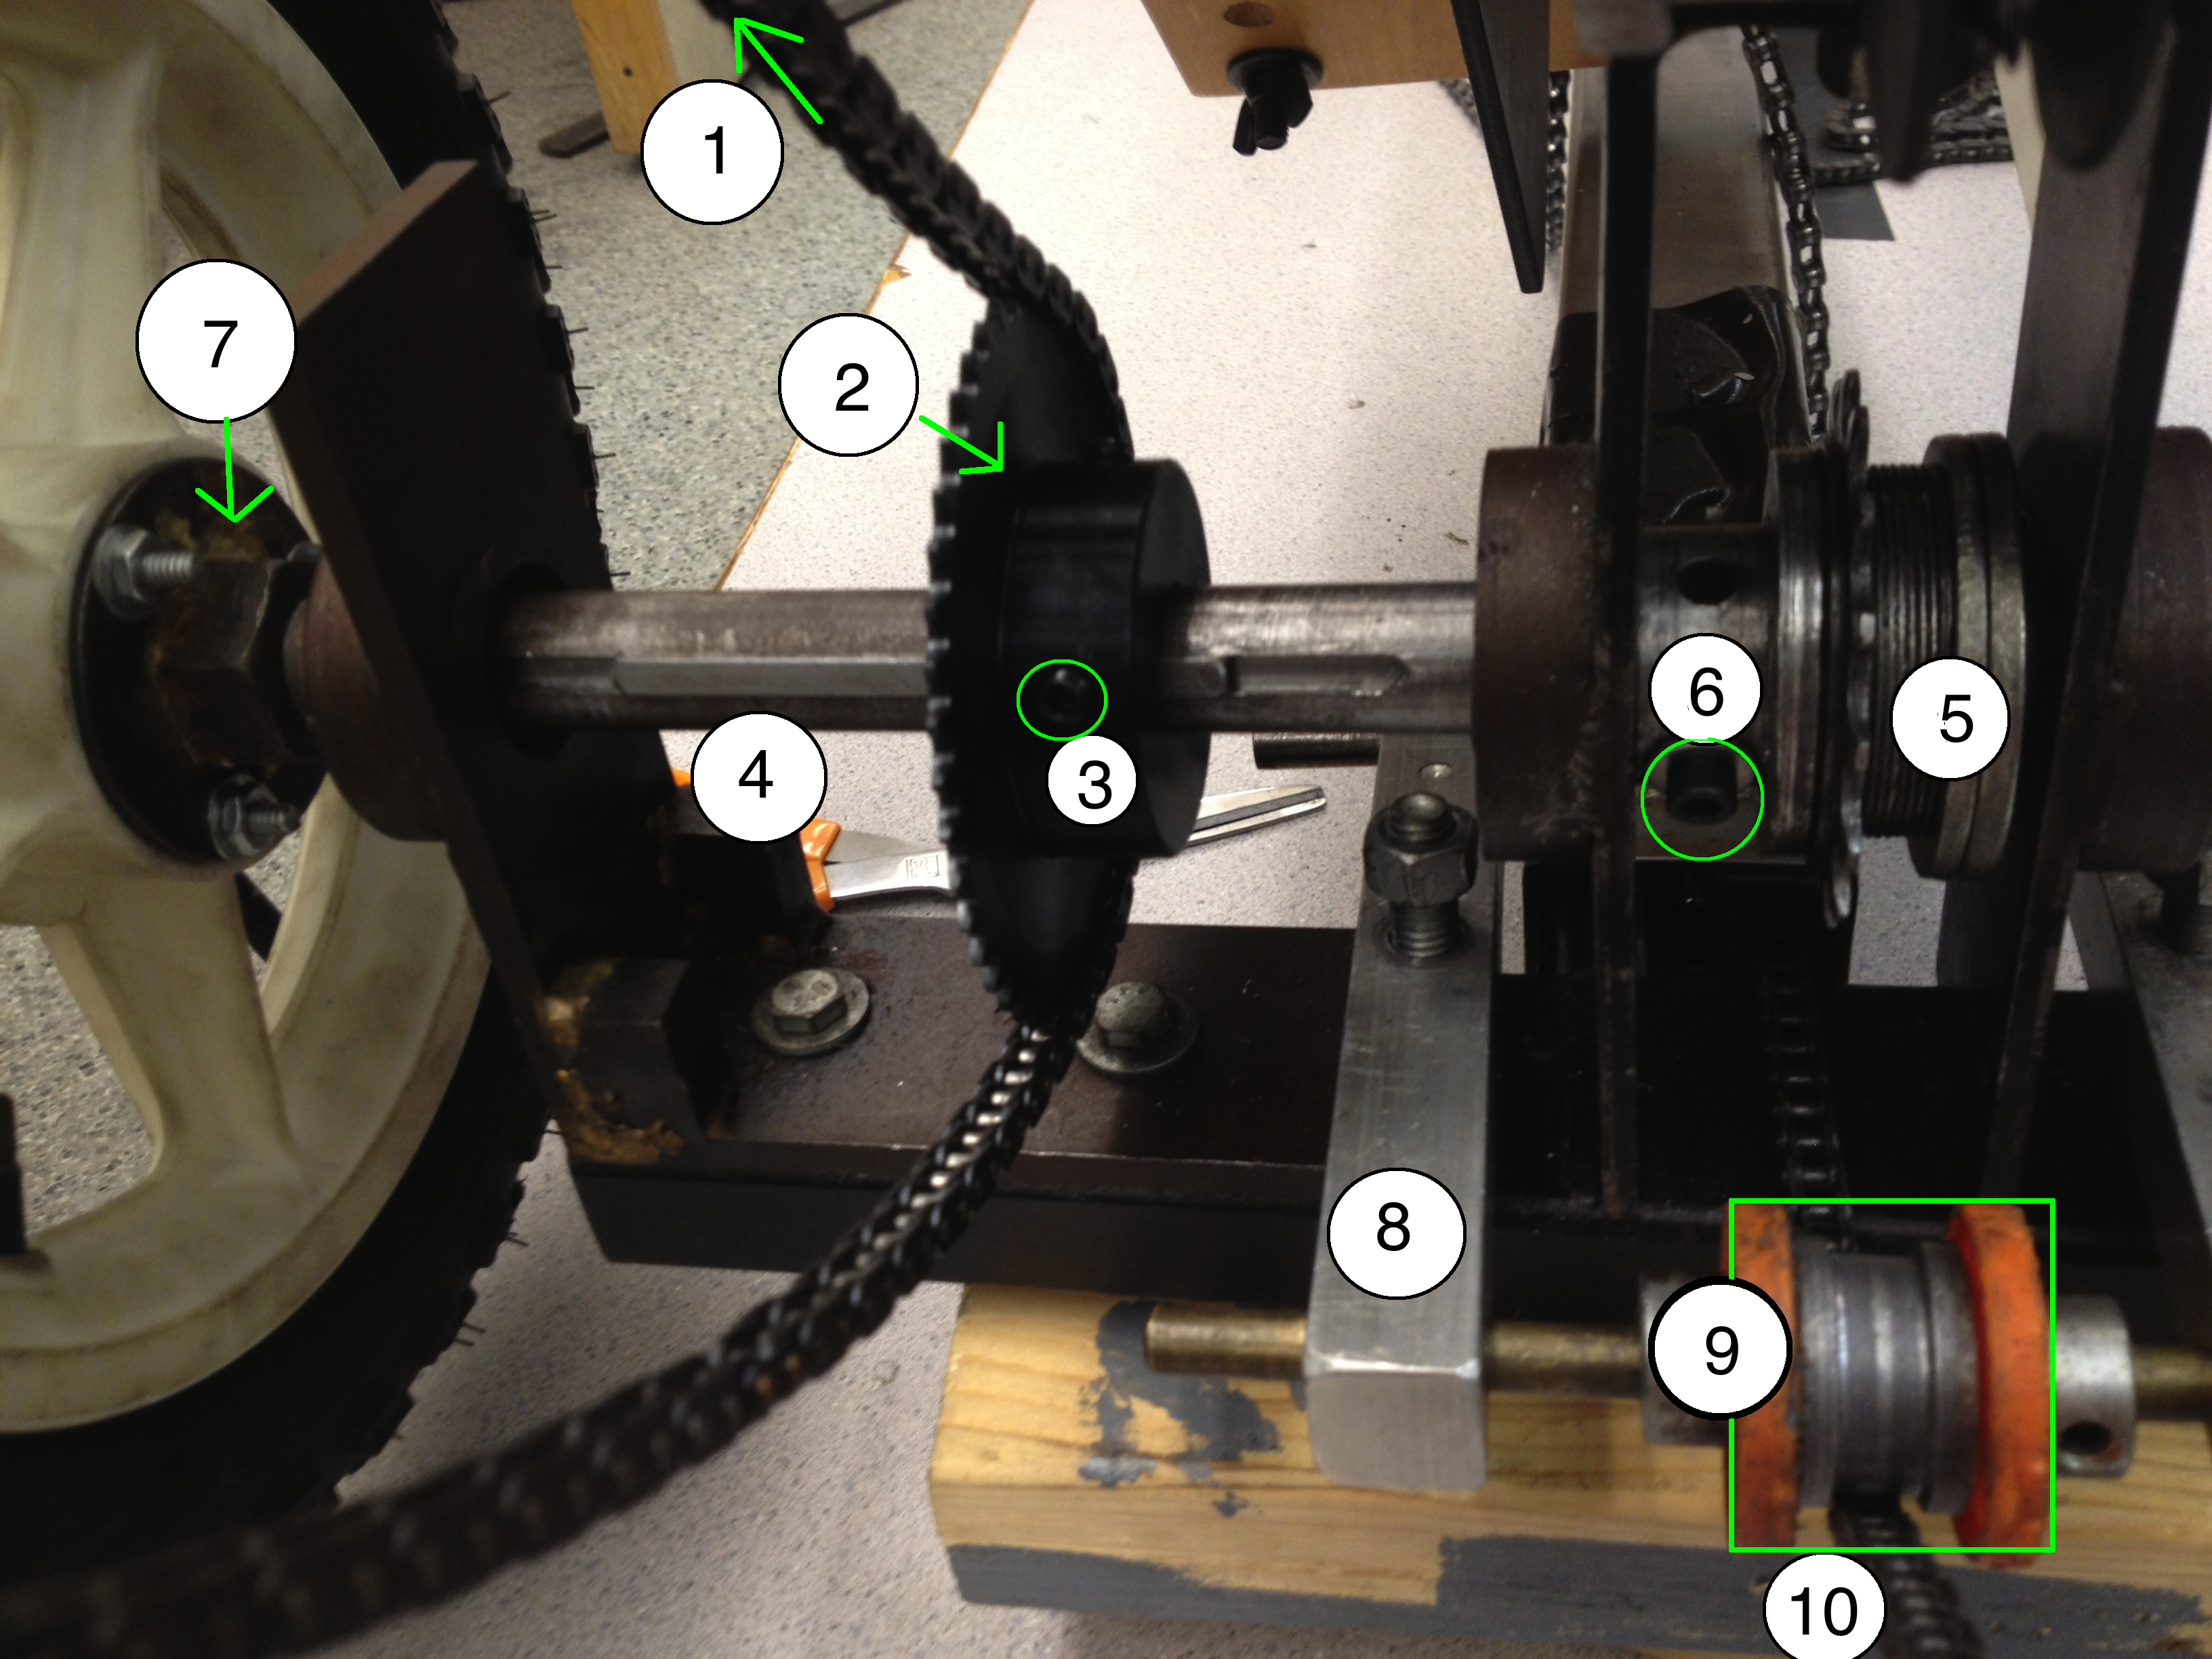
We separated the pieces on the differential and wheel axle. The numbers in the above picture correspond to:
- A differential half shaft. The new #25 wheel sprocket will go here.
- The old #40 wheel sprocket of the differential that we no longer need. It used to be attached to part (1).
- A cup of differential parts. This contains the spur gears that define the dynamics of the differential. The circular plate at the top of the cup is one of the side plates of the differential housing.
- The other differential half shaft and its differential side plate. This shorter shaft will hold the #25 flywheel sprocket.
- The #25 handle sprocket. There are four small holes on it with which we will bolt the sprocket to the main differential gear. This makes the handle sprocket the middle gear on the differential.
- The #25 flywheel sprocket. This will go on part (4).
- The old #40 wheel sprocket that went on the wheel axle that we no longer need. It will be replaced by a larger, thinner #25 sprocket.
- The differential housing. This keeps all the interior spur gears together and serves as the connection point between the two half shafts of the differential.
- Wheel axle bearings, bolts, nuts, washers, etc.
While waiting for our shipment of new sprockets to come in, today we tore apart the erg in preparation for installing these new chompers (sprockets have teeth). This included:
- Taking off the heavy duty #40 chain because we will be replacing it with a much lighter #25 chain, the same kind that comes with Concept II ergs.
- Removing the differential axle and the wheel axle from the erg.
- Hammering off old sprockets from the differential.

This vise clamped onto the differential while we were hammering away.
We read through a bunch of articles on rowing. It seems like Kleshnev is the expert in rowing, with the rowing coach Christopher Kerber even referring us to KIeshnev's 2006 article. So far, we have Kleshnev's 2004, 2005, 2006, and 2009 papers, and there are even more newsletters on his website http://www.biorow.com/. In fact, he even visited Cornell earlier this Spring, in April, to test his sensory product with the rowing teams in Cornell, Yale, and UPenn. I think it will be interesting to compare his test results over the years and look for similarities and/or discrepancies in his studies.
Additionally, I looked into video motion tracker tools and found http://www.cabrillo.edu/~dbrown/tracker/. I will play around with this program to see if we can use it to analyze the videos of people on ergs (like 2013.06.05 William Tyler Nebel Rowing.mov) to plot the positions of hands, rower body, and seat to make a more concrete case for our arguments and have original data.
LW crew coach Chris Kerber, replied back, referred us to Kleshnev's article (see below), and asked for specifics on what we wanted. I replied back, writing that graphs that describe the force profile over the course of the power stroke are great, and I asked to see some similar data from the Cornell crew.
Read publications on rowing and erging:
1. Modelling the Rowing Stroke in Racing Shells
Maurice N. Brearley, Neville J. de Mestre and Donald R. Watson
The Mathematical Gazette , Vol. 82, No. 495 (Nov., 1998), pp. 389-404
Published by: The Mathematical Association
Article Stable URL: http://www.jstor.org/stable/3619885
- The water drag force Unable to find DVI conversion log file., where Unable to find DVI conversion log file. is the velocity of the racing scull, and Unable to find DVI conversion log file. are constants that can be obtained through regression analysis from rowing data.
2. Kleshnev, Valery. "Rowing Biomechanics." BioRow. N.p., 2006. Web. 7 June 2013. <http://biorow.org/publ/2006_rowing_biomechanics/1-1-0-20>.
- This article covers the difference between boat types, rowing efficiency, common rigging set-up dimensions, accelerations/forces on the boat/rower over the course of a stroke, and rowing techinques. It's a snappy technical overview of rowing.
- There are four major categories of rowing styles, each defined by whether they emphasize the trunk or the legs, and if the trunks and legs extend simultaneously or consequently.
- "A force curve with a peak increases blade slippage and decreases efficiency. Conversely, a rectangular shape of the force curve affects efficiency positively." - page 7
aturday, June 1st
The majority of this day was spent on a Skype call with Andy, addressing the conceptual issues with the ergometer. 
The main problem we were facing was how to match the gear ratios to what they were with the floating pulley. While Andy had been suggesting that we put the wheel chain in the center of the differential instead of the handle chain, we were nervous about this because of what a major change it would be.
First, the wheel chain had a different pitch and size as all of the other chains on the erg. Putting the wheel chain in the center of the differential would require purchasing several more axels. Second, the erg is the easiest to use when the handle chain axel aligned with the seat. If the wheel chain was in the center, the handle chain would no longer be aligned with the seat, creating a lot of bad lateral action on that gear.
With these problems present in rearranging the order of the chains on the differential, we decided to keep things in the same order and change the gear ratios on the wheel chain. With the size of all three gears being the same at this point, we needed to make the wheel axel on the differential four times smaller to match the gear ratios from the floating pulley setup. Later, when shopping, we discovered that such an axel didn't exist. We instead found an axel half the size of what was on the differential, and then doubled the size of the axel directly on the wheel axel; this creates the same gear ratio.
We also had been having a hard time with all of the different chain pitches; since we were buying two new axels anyways, we got them with #25 chain to limit the number of chain types we were working with.
Second, on the chain and bungee system labeled #6, there is a conceptual issue in that there is a bungee on one end, and a fixed end on the other; while the bungee can expand and contract, there's nothing else to account for the its change in lengths. At best, we could make a tense bungee leave some slack on the chain near the fixed end. Our solution was to put a very soft and non-stretched end just to hold up the slack.
However, Andy additionally pointed out that axel #5 was still unnecessary. We could eliminate the extra axel by putting that new soft bungee right underneath the hard bungee that was already there. After this discussion with Andy, we were left with this design:

Figure 1: Rowgometer Setup
Shortly after calling Andy, we put together a schedule for the week:
Plan for the week:
- Presentation:
- finish CAD, although not necessary
- run Brian’s version of Tennant’s code, or find a floppy drive
- make clear that all observations are of the floating pulley, erg,
- want to develop differential model
- clean up slides
- some slides are incomplete
- Contact Concept II
- get contact info
- draft email or phone message
- Work on erg
- compressing a chain doesn’t make sense
- idea: bungee cord at end of #41 chain – clear with Ellen and Andy
- Order sprockets - ASAP
- changing gear ratios
- Set up a blog
- wordpress, blogspot, piazza?
- compressing a chain doesn’t make sense
Deadline: June 15th – have a meeting set up with Concept II
Monday, June 3rd
We began to conquer the schedule we made after calling Andy on Saturday. Because of the delay in shipping, we decided to start by ordering the appropriate new axels for the wheel chain and its axels. We measured the dimensions around the chains to make sure we were producing the same gear ratios as the floating pulleys and made sure the axels we wanted to order actually fit. After confirming these, wrote up and sent the order to Joe.
After, I went back to work on the presentation. Many of my edits were eliminating text, saying the same things in fewer words. The less words there are on the slide, the more visually appealing it is. My other changes made the presentation more visually appealing. I kept the text sizes as similar as I could from slide to slide, made sure all text was large enough to read, made the graphs easier to read, took some new pictures to make them more appropriate to their slide, and the like.
There are two things here I dislike that I want to ask Andy about. First, I dislike the two slides labeled "Forces." I think some of the information is not completely accurate. For example, it's the job of the flywheel, not the bungees, to create the drag force of the water. Also, even if I completely agreed with all of the information in these slides, I don't see how they help sell our erg. The slides before it completely explain how the differential makes our erg superior because the erg itself actually moves - these two "Forces" slides don't add anything.
Second, I really feel like asking for more than one stationary erg to use for parts is too much . The only reason we want more than one erg is for comparison at the end. It seems silly to ask for an erg to only use once. We can easily go to Teagle to get any comparisons we need there.
Tuesday, June 4th
I received Andy's reply to my email about the presentation from the day before.
First, he insisted that we keep the "Forces" slides. After spending some time looking at the other diagrams and figuring out what these forces were, I went back and reworded the forces to make it clearer what they were. I also changed the title to "Accelerations & Forces" to again enhance the clarity of what these slides were talking about.
Second, Andy said it was okay to only ask for the one stationary erg. I liked this because we'll seem more reasonable to Concept II if we ask for less stuff, and seeming more reasonable will make it more likely for them to give us what we actually need.
Back to the erg, we need a chain long enough to create the entire chain that wraps around axel 15c in figure 1. We do not have enough of the chain that fits that axel, so we head down to the bike rack in collegetown to buy more chain so we can make this system. Upon taking the chain to college town, we discover that this one chain we found that fit the wheel axel actually had four different types of chain in it. We spend a while struggling to find the right type of chain and chain link to buy, but after a few trips back and forth, we have the chain we need.
Later, it was time to actually put in effect the changes that we discussed with Andy on the skype call on Saturday. First, we ordered new the sprockets to connect the differential and the wheel axel to produce the same gear ratios and torques we had in the floating pulley setup. This involved putting a smaller sprocket on the differential axel and a larger sprocket on the wheel axel, thus increasing the torque that will be applied to the wheel axel. While this, in theory, results in less motion of the erg, our current setup doesn't apply enough torque to move the erg at all. We need to lessen the theoretical distance that the erg should move in order to get the erg to move at all. We also decided to get sprockets with #41 chain because the big thick chain we have now is completely unnecessary, and the project will be simplified if we limit how many different chain types we have. We found the best sprockets for the price and put the order in with Joe.
After we ordered the sprockets, we started to figure out how to actually assemble the system labeled B2 on figure 1. We took the stiff bungees that we coiled over themselves several times (figure 2,) and took one more bungee off, taking it down to three total. We did this because with the four bungees it had before, it barely stretched no matter how much you pulled on it. We removed the bungee so it could actually stretch a little bit, allowing it to act more like a bungee and less like a chain.

Figure 2: The Stiff Bungees
We then went hunting for a soft bungee to put in parallel with the spring on the top. The only purpose of this bungee is to collect the chain, to it doesn't need to have a high force. In fact, it's best to keep the force small because the higher the force this bungee exerts, the more resistance the rower will feel. It needs to be stiff enough to collect the chain slack, but nothing more.
Wednesday, June 5th
One of our main events of the day was to going to Teagle to test out their ergometers to learn about how they work and get a feel for how they row. After getting permission to use the crew team's room, we were given to stationary ergs both directly on the floor and on sliders.
The stationary erg, while it got very exhausting very quickly, didn't feel anything like what rowing on water could feel like; it felt like nothing more than me pushing myself back and forth with my feet. It would be the same sensation as me putting my feet on a table and rolling back and forth in a wheeled-chair.
The stationary ergs with sliders were even worse. While rowing on it, it felt like I wasn't moving at all, and that I was just pushing the erg back and forth with my feet.
A member of the crew team was rowing when we arrived, and he let us take a short video of him on the sliders: https://cornell.box.com/files/0/f/724664803/1/f_8513255425. This video shows the sliders looking the same as the felt, the rower wasn't moving at all.
This experience gave me two new insights to the rogometer. First, seeing how unrealistic of the motion of the erg was, I have much more appreciation for the type of erg we're making. Second, the trend here was that the ergs did whatever they had to do to minimize their total momentum. This explains why our project was so challenging - not only do we have to fight this trend, but the amount of energy we need to get from the rower to create the motion to pull the erg we need to is far more than what can be done with the stationary erg designs we looked at. Our erg has to have more resistance in the handle than these ergs just because it has to go to not only the flywheel, but also the kinetic energy to roll the erg back and the potential energy in the bungees to roll the erg back forward.
Back at the lab, we were finishing our assembly of the system labeled 2B in figure 1 to actually work. We first discussed how to set this new system up on the erg. We universally agreed that the hard bungees wrapped around each other should go directly on top of the bottom bar (the bar below what the seat slides on.) This was the clear choice because it could easily just rest on top without getting in the way of anything else. The bungees even had a hook on one end so it would be easy to fix it to the boward end of the erg.
The question was where to put the soft bungee and chain in parallel. One possibility we considered was to put them inside the bar that the seat slid on. While this would keep them from tangling up with anything else, we would have very limited access. If we needed to make a change, it would be very hard to get to. The other possibility was to try to hang the soft bungee and spring beneath the bar. While this setup would be much easier to set up and edit, we had the fear of it dipping too far down and getting tangled with the chain and bungees below it since there wouldn't be any solid object separating them.
Between these two choices, we decided to take the risk of tangling and try hanging it below the bar the seat rolls on. If this does not work because of tangling, we can easily undo it and put it in the bar without much lost time.
We hooked the bottom bungee onto the stern of the erg, attached the chain to the other end of the bungee, and wrapped the chain around the wheel axel. The chain then wrapped all the way back to the stern of th erg.
For the loose bungee on top, while it would be easy to attach the one end to the stern, how to attach it to the chain half way across the erg was a challenge. The only solution we could think of would be to wrap something really tightly around the bungee and the chain, and hope there is enough friction to hold the two together. We took a twist tie and wrapped it around the two, and hoped for the best. (Figure 3)

Figure 3: Twist tie around the bungee and chain
To hold the loose end of the bungee, we looped it around itself a few times and taped it beneath the footrests so it's out of the way. The system, as a whole, looked like figure 4.

Figure 4: The completed Setup
When the bungees are slack (unlike they are in the figure,) they become wider and fall off the edges of the bar. The cardboard pieces on the sides keep the bungees from falling off of the sides.
The key part of this setup that we were worried about is the upper chain getting tangled in the stiff bungees. Luckily, this did not turn out to be an issue because the soft bungee successfully kept the slack from falling down too far.
Upon testing this system, however, it didn't work. The problem, as it has been the whole time, that the wheel axel on the differential didn't turn. This new system we just installed worked perfectly as far as we could tell - there just wasn't enough torque to power it. Hopefully these new axels we ordered will fix this problem.
Made a bunch of documentation to teach how to use the Confluence wiki today.
See Useful Websites, Using Confluence - Tips and Tricks
Plan on researching more erg information tomorrow.