Jenkins is an open source continuous integration tool used to shorten the development lifecycle by automating the test and build process. We built Jenkins into Project Diaper’s infrastructure to automate away some of the tedious tests previously given to the infrastructure team when new builds were being deployed.
Current Jenkins server:
Hosted at https://jenkins.diaper.cf/ with the help of nginx. Please see the nginx config file at the following location for more information.
/etc/nginx/nginx.conf
Administrators login using the username and password stored in the login secrets folder on Box.
Current CI/CD Architecture
The current Jenkins configuration consists of 3 pipelines: one for dashboard-frontend, one for dashboard-backend, and one for mobile-backend. The pipelines are configured to automatically build the docker image after a push to the master branch (Github uses webhook to notify Jenkins that a new push is made). It then docker push the image to our private docker registry, called nexus, which is hosted on our K8s Cluster. Finally, an email with all output from each pipeline job run and the results of the job are sent to the diaperjenkins@gmail.com email address (password set to the password stored in the login secrets file on Box).
Each pipeline is currently hosted here DIAPER-project/jenkins-pipelines in the for of three separate Jenkinsfiles which specify the main behavior of the pipelines.
How to add on
If you want to build a new Jenkins pipeline, you start by navigating to the Jenkins dashboard, login with the username and password.
Click "New Item," then enter a name and click "Pipeline," followed by "Ok." Then configure the pipeline with the following options:

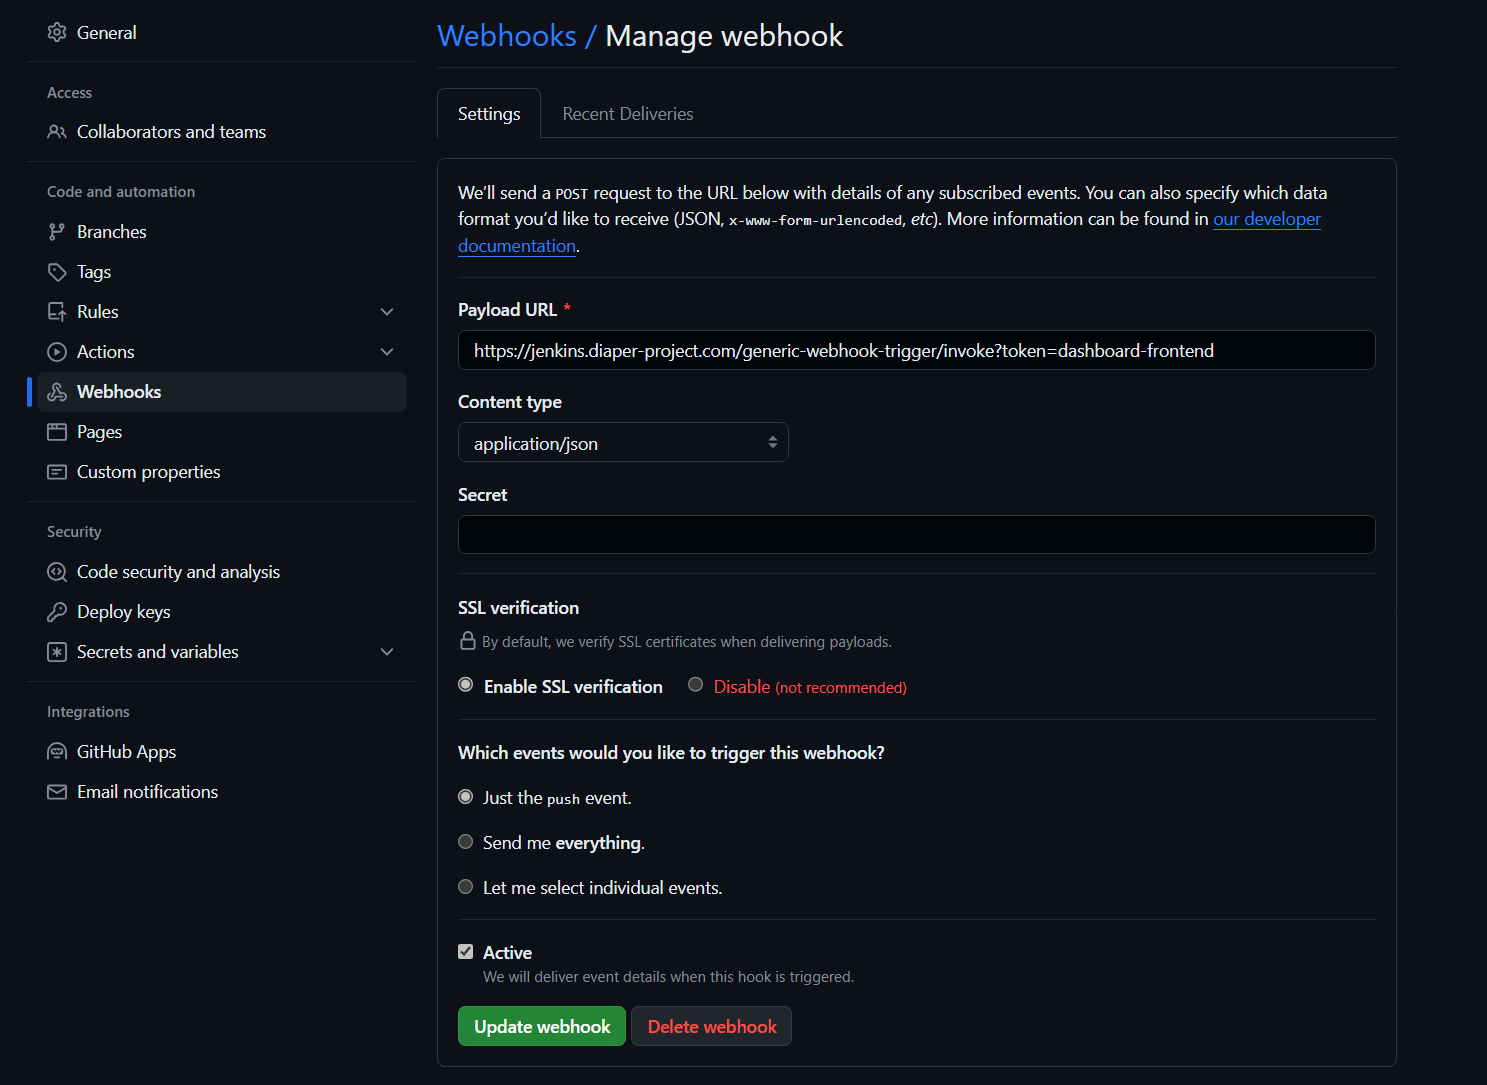
Finally, you need to add web hooks to that very repository with the following configuration:
Troubleshooting
The first step to diagnose issues with the Jenkins server itself is to ssh into the Jenkins EC2 instance and run the following command:
$ sudo systemctl status jenkins
It should say Active: active (running). If you see some other status besides that you need to restart the server with the following command:
$ sudo systemctl restart jenkins
For other issues with the Jenkins server itself consider making sure its SSL cert is not expired or checking the status of the nginx server.
If Jenkins is up and running and anything goes wrong with a build you should consult the errors either sent to the email or stored in the failed job report in Jenkins. You can find this by navigating to jenkins.diaper-project.com and signing in with the username and password and clicking on the relevant job.
Restoring the Jenkins Server:
In the incredibly unlikely event that the Jenkins server fails, we backed up our EC2 instance to avoid repeating the many hours of work that went into the current configuration. All you need to do is navigate to the EC2 management console, click "Launch an instance", then click on "My AMIs" and select the most recently stored "Jenkins Server" Linux AMI. Next select T3 micro as the instance type. Then click the configure instance header at the top of the screen and then set the following settings:

Finally go into "Configure Security Group" click "Select an existing security group" and then check the box next to Production SG. Finally click "Review and Launch" followed by "Launch." Next select to use an existing key pair from the dropdown menu that appears, select DIAPER-production-key as the key, and click "Launch Instances." A new AWS EC2 server should now begin running with all configurations as of the end of Fall 2021 stored. I recommend backing up the server after any significant changes to the Jenkins EC2 instance configuration.
Installing Jenkins:
While you will likely never need to setup Jenkins yourself, as in the case of a failure you should just restore the EC2 instance. In case that is not possible we created this tutorial to make it easier to reconfigure Jenkins on a new EC2 instance if the need were to arise so you can reuse the pipeline code stored in GitHub and avoid starting a new pipeline from scratch. Before beginning this tutorial make sure you are comfortable interacting with our AWS EC2 instances via SSH.
Generally you just need to follow the tutorial here, and troubleshooting info for issues I ran into during the initial installation are provided below:
https://www.jenkins.io/doc/tutorials/tutorial-for-installing-jenkins-on-AWS/
Errors
curl: (60) SSL certificate problem: certificate has expired
More details here: https://curl.haxx.se/docs/sslcerts.html

curl failed to verify the legitimacy of the server and therefore could not
establish a secure connection to it. To learn more about this situation and
how to fix it, please visit the web page mentioned above.
error: https://pkg.jenkins.io/redhat-stable/jenkins.io.key: import read failed(2).
Try running
$ yum upgrade ca-certificates
and if that doesn’t work try
$ sudo yum upgrade ca-certificates --disablerepo=jenkins
If you get the following error:
Error: Package: jenkins-2.319.1-1.1.noarch (jenkins)
           Requires: daemonize
 You could try using --skip-broken to work around the problem
 You could try running: rpm -Va --nofiles --nodigest
run
$ sudo amazon-linux-extras install epel -y
$ sudo yum install daemonize -y
$ sudo yum install jenkins java-1.8.0-openjdk-devel -y
Additionally following the installation you need to change the default user Jenkins runs as to "ec2-user". You can follow instructions given here: http://blog.manula.org/2013/03/running-jenkins-under-different-user-in.html
You will also need to install the Publish Over SSH plugin and add the private key of the Jenkins server to the Publish Over SSH options under the "Configure System" subpage of "Manage Jenkins." You'll also need to configure a key pair for accessing Github using "Manage Credentials" under "Manage Jenkins." Information on how to configure these plugins is widely available on StackOverflow and Jenkins own docs page.