 Sign-up for free online course on ANSYS simulations!
| Include Page | ||||
|---|---|---|---|---|
|
| Include Page | ||||
|---|---|---|---|---|
|
Start-Up
| HTML |
|---|
<iframe width="640" height="360" src="https://www.youtube.com/embed/Yug08tGTNNA" frameborder="0" allowfullscreen></iframe> |
Create Sketch
| HTML |
|---|
<iframe width="640" height="360" src="https://www.youtube.com/embed/-Gw21m4x73E" frameborder="0" allowfullscreen></iframe> |
Create Area
| HTML |
|---|
<iframe width="640" height="360" src="https://www.youtube.com/embed/6XX48cJH3Gg" frameborder="0" allowfullscreen></iframe> |
Save Project
| HTML |
|---|
<iframe width="640" height="360" src="https://www.youtube.com/embed/4W3dAjCooTs" frameborder="0" allowfullscreen></iframe> |
Check Your Understanding
Select true or false.
| Panel |
|---|
Problem Specification |
| Note | ||
|---|---|---|
| ||
We are working on updating this part of the tutorial. Please come back soon. |
Step 2: Geometry
Since our problem involves fluid flow, we will select the FLUENT component on the left panel.
...
https://confluence.cornell.edu/download/attachments/111221570/ScreenOrientation.PNG...
Creating a Sketch
...
https://confluence.cornell.edu/download/attachments/123547957/Select+Sketching+Toolboxes.gif...
https://confluence.cornell.edu/download/attachments/111221570/Select+Normal+View.gif...
You should have something like this: 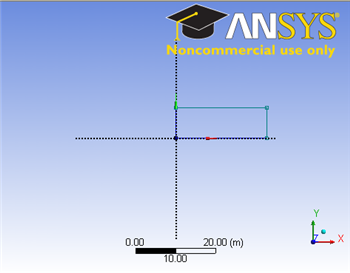
Note: You do not have to worry about geometry for now, we can dimension them properly in the later step.
Modify the Sketch
Go to Step 3: Mesh