 Sign-up for free online course on ANSYS simulations!
| Include Page | ||||
|---|---|---|---|---|
|
| Include Page | (Tutorial Name) - Panel | (Tutorial Name) - Panel |
|---|
Numerical Solution
| Note |
|---|
Under Construction |
|
Case Setup
Setting up case 1:
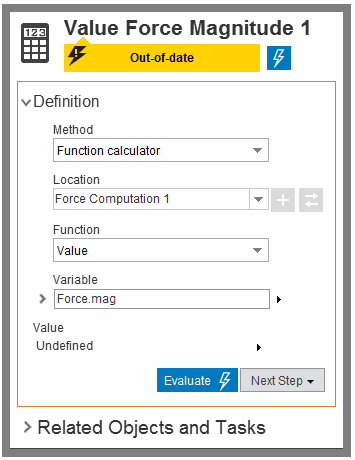
The last parameter we need to define is the force on the magnet. Go to Results in the workflow. Under Objects, click on Results again. Select Value Force Magnitude 1. Click on the arrow horizontal from undefined and select parametrize.
Click on the Design Points dashboard in the upper right hand corner.

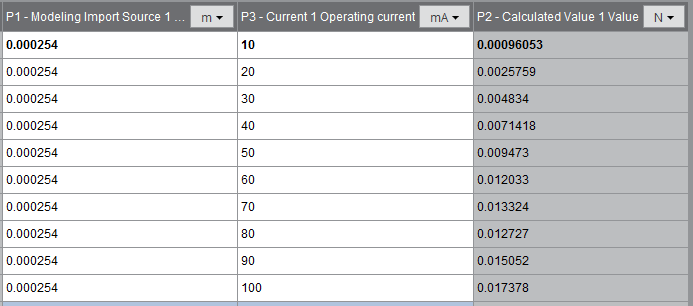
The first table that comes up is the design points. Under Current 1 Operating current, iterate the input by 10 mA up to 100mA. Use the image below for reference. In the other column, input 0.254mm for the horizontal(R) distance. Once this is done, click Update All in the top right corner of the design points dashboard. AIM will solve each case for the force on the magnet and the force outputs for each current input can be seen in the design points dashboard.
Setting up case 2:
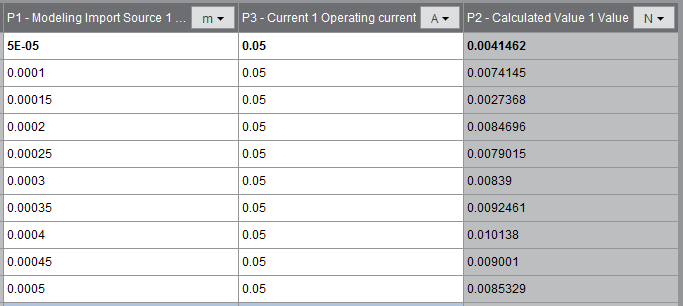
In case two, the force of the magnetic is a function of horizontal(R) distance. In the design parameters dashpoint, change all the current data points to 50mA. Then iterate the horizontal data points from 0.05mm-.5mm by 0.05mm. Click update all to see results.
Go to Step 5: Solution/Results
Go to all ANSYS AIM Go to Step 6: Numerical ResultsGo to all (ANSYS or FLUENT) Learning Modules