Sign-up for free online course on ANSYS simulations!
...
| Info | ||
|---|---|---|
| ||
If you see an error stating that the surfaces are higher order KNOBS, ignore it: it simply says that creating the mesh may take a while but I've never had to wait more than a minute for it to generate. |
The first thing we are going to need to do when the mesher opens is specify the thickness of the airfoil walls. In the Outline window, expand Geometry and select Part 1. In the Details window, change the thickness to 0.001 m.
Mapped Face Meshing
To apply a mapped face meshing, first click on Mesh in the Outline window. This will bring up the Meshing Menu Bar at the top of the screen. Next, select Mesh Control > Mapped Face Meshing. Select the 2 faces of the mesh by holding down the left mouse button and dragging over the entire geometry. In the Details window, click Geometry > Apply - it should say 2 faces are selected.
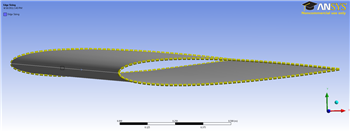
Edge Sizing
In the Meshing Menu, click Meshing Control > Sizing. Click the edge selection filter  . Select the four curved edges on the outside of the airfoil as the picture shows: