 Sign-up for free online course on ANSYS simulations!
...
Step 1: Pre-Analysis and Start-Up
Strategy for Creating Geometry
In order to create the rectangle, we will first create the vertices at the four corners. We'll then join adjacent vertices by straight lines to form the "edges" of the rectangle. Lastly, we'll create a "face" corresponding to the area enclosed by the edges. In Step 2, we'll mesh the face i.e. the rectangle. Note that in 3D problems, you'll have to form a "volume" from faces.
Create a Working Directory
Start ANSYS FLUENT
Prior to opening ANSYS, create a folder called pipe Create a folder called "flat Plate Boundary Layer" in a convenient location. We'll use this as the working folder in which files created during the session will be stored.
Start ANSYS FLUENT
We'll run FLUENT For this simulation Fluent will be run within the ANSYS Workbench interfaceInterface. Start ANSYS workbench:
Start> All Programs> Ansys 12.1> Workbench
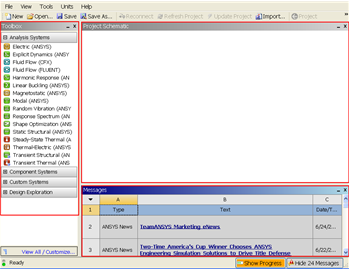
The following figure shows the workbench window.
 .
.

| newwindow | ||||
|---|---|---|---|---|
| ||||
https://confluence.cornell.edu/download/attachments/111221567/Workbench.png |
Management of Screen Real Estate
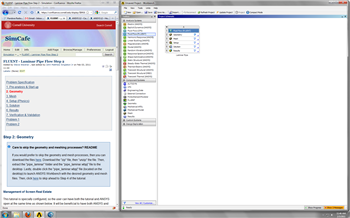
This tutorial is specially configured, so the user can have both the tutorial and ANSYS open at the same time as shown below. It will be beneficial to have both ANSYS and your internet browser displayed on your monitor simultaneously. Your internet browser should consume approximately one third of the screen width while ANSYS should take the other two thirds as shown below.
| newwindow | ||||
|---|---|---|---|---|
| ||||
https://confluence.cornell.edu/download/attachments/85624044/RealEstate_Full.png |