 Sign-up for free online course on ANSYS simulations!
...
There are two options for creating the eight vertices: we can use the mouse after pressing the Click SD Points button, or we can enter the coordinates directly into the edit boxes under Vertex positions. We'll use the latter option. Enter the above coordinates in the corresponding edit boxes under Vertex positions as shown below. You can use MATLAB expressions within these boxes. For instance, for the x coordinate of the fifth vertex, enter coscosd(pi/630)-0.5*sinsind(pi/630) under Xpos (note that angles need to be entered in radians). Recall that, after you have entered a value, you can use the Tab key to jump to the next box. Remember to use the correct trig function for how you express your angles: if you enter the angle in degrees, you must use the MATLAB functions sind and cosd, if you enter the angle in radians you must use the MATLAB functions sin and cos.
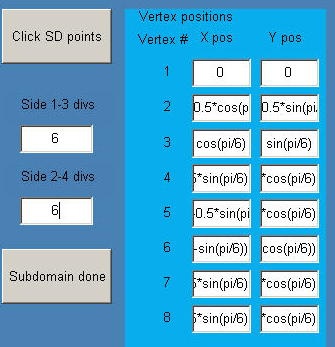
Next, we need to enter the number of divisions for each side. This specifies the number of elements that will be created along each side. Opposite sides need to have an equal number of divisions. So, in the above schematic of vertex positions, sides 1 and 3 should have an equal number of divisions as should sides 2 and 4. (Notice that sides are numbered in the same counterclockwise order as vertices, starting at the first vertex.) We'll use 6 divisions for each side. So enter 6 for Side 1-3 divs as well as Side 2-4 divs (see above figure).
...
Go to Step 3: Setup (Physics)
See and rate the complete Learning Module
...