 Sign-up for free online course on ANSYS simulations!
Step 1: Start-up and preliminary set-up
Create a folder
Create a folder called plate at a convenient location. We'll use this folder to store files created during the ANSYS session.
Start ANSYS
Start > Programs > Lab Apps > ANSYS 10.0 > ANSYS Product Launcher
...
In Netscape: Menubar > View > Increase Font or Menubar > View > Decrease Font
Set Preferences
As before, we'll more or less work our way down the Main Menu.
...
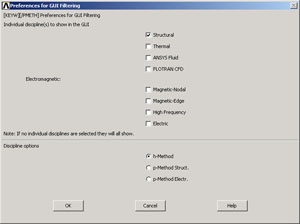
Recall that this is an optional step that customizes the graphical user interface so that only menu options valid for structural problems are made available during the ANSYS session.
Enter Parameters
For convenience, we'll create scalar parameters corresponding to the plate half-width a, hole radius r, pressure p, and material properties E and v.
...
Similarly, enter the other parameter values and click Accept after each.
r=7e-3
p=1e6
E=1e13
nu=0.3
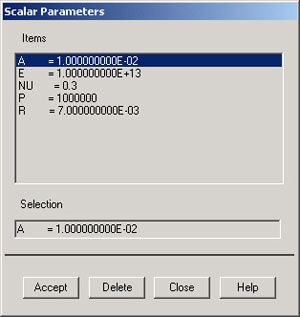
Close the Scalar Parameters window.
...
Go to Step 2: Specify element type and constants