...
Your AWS account will need a Cornell Standard VPC configured with Direct Connect. You will also need a VPC peer to the Cornell Core VPC for access to Cornell Active Directory DC's in AWS.
| Info |
|---|
| All of the above will be configured for you by the IT@Cornell Cloud Team. Once these items are set up, you are ready to start administering Amazon WorkSpaces! |
...
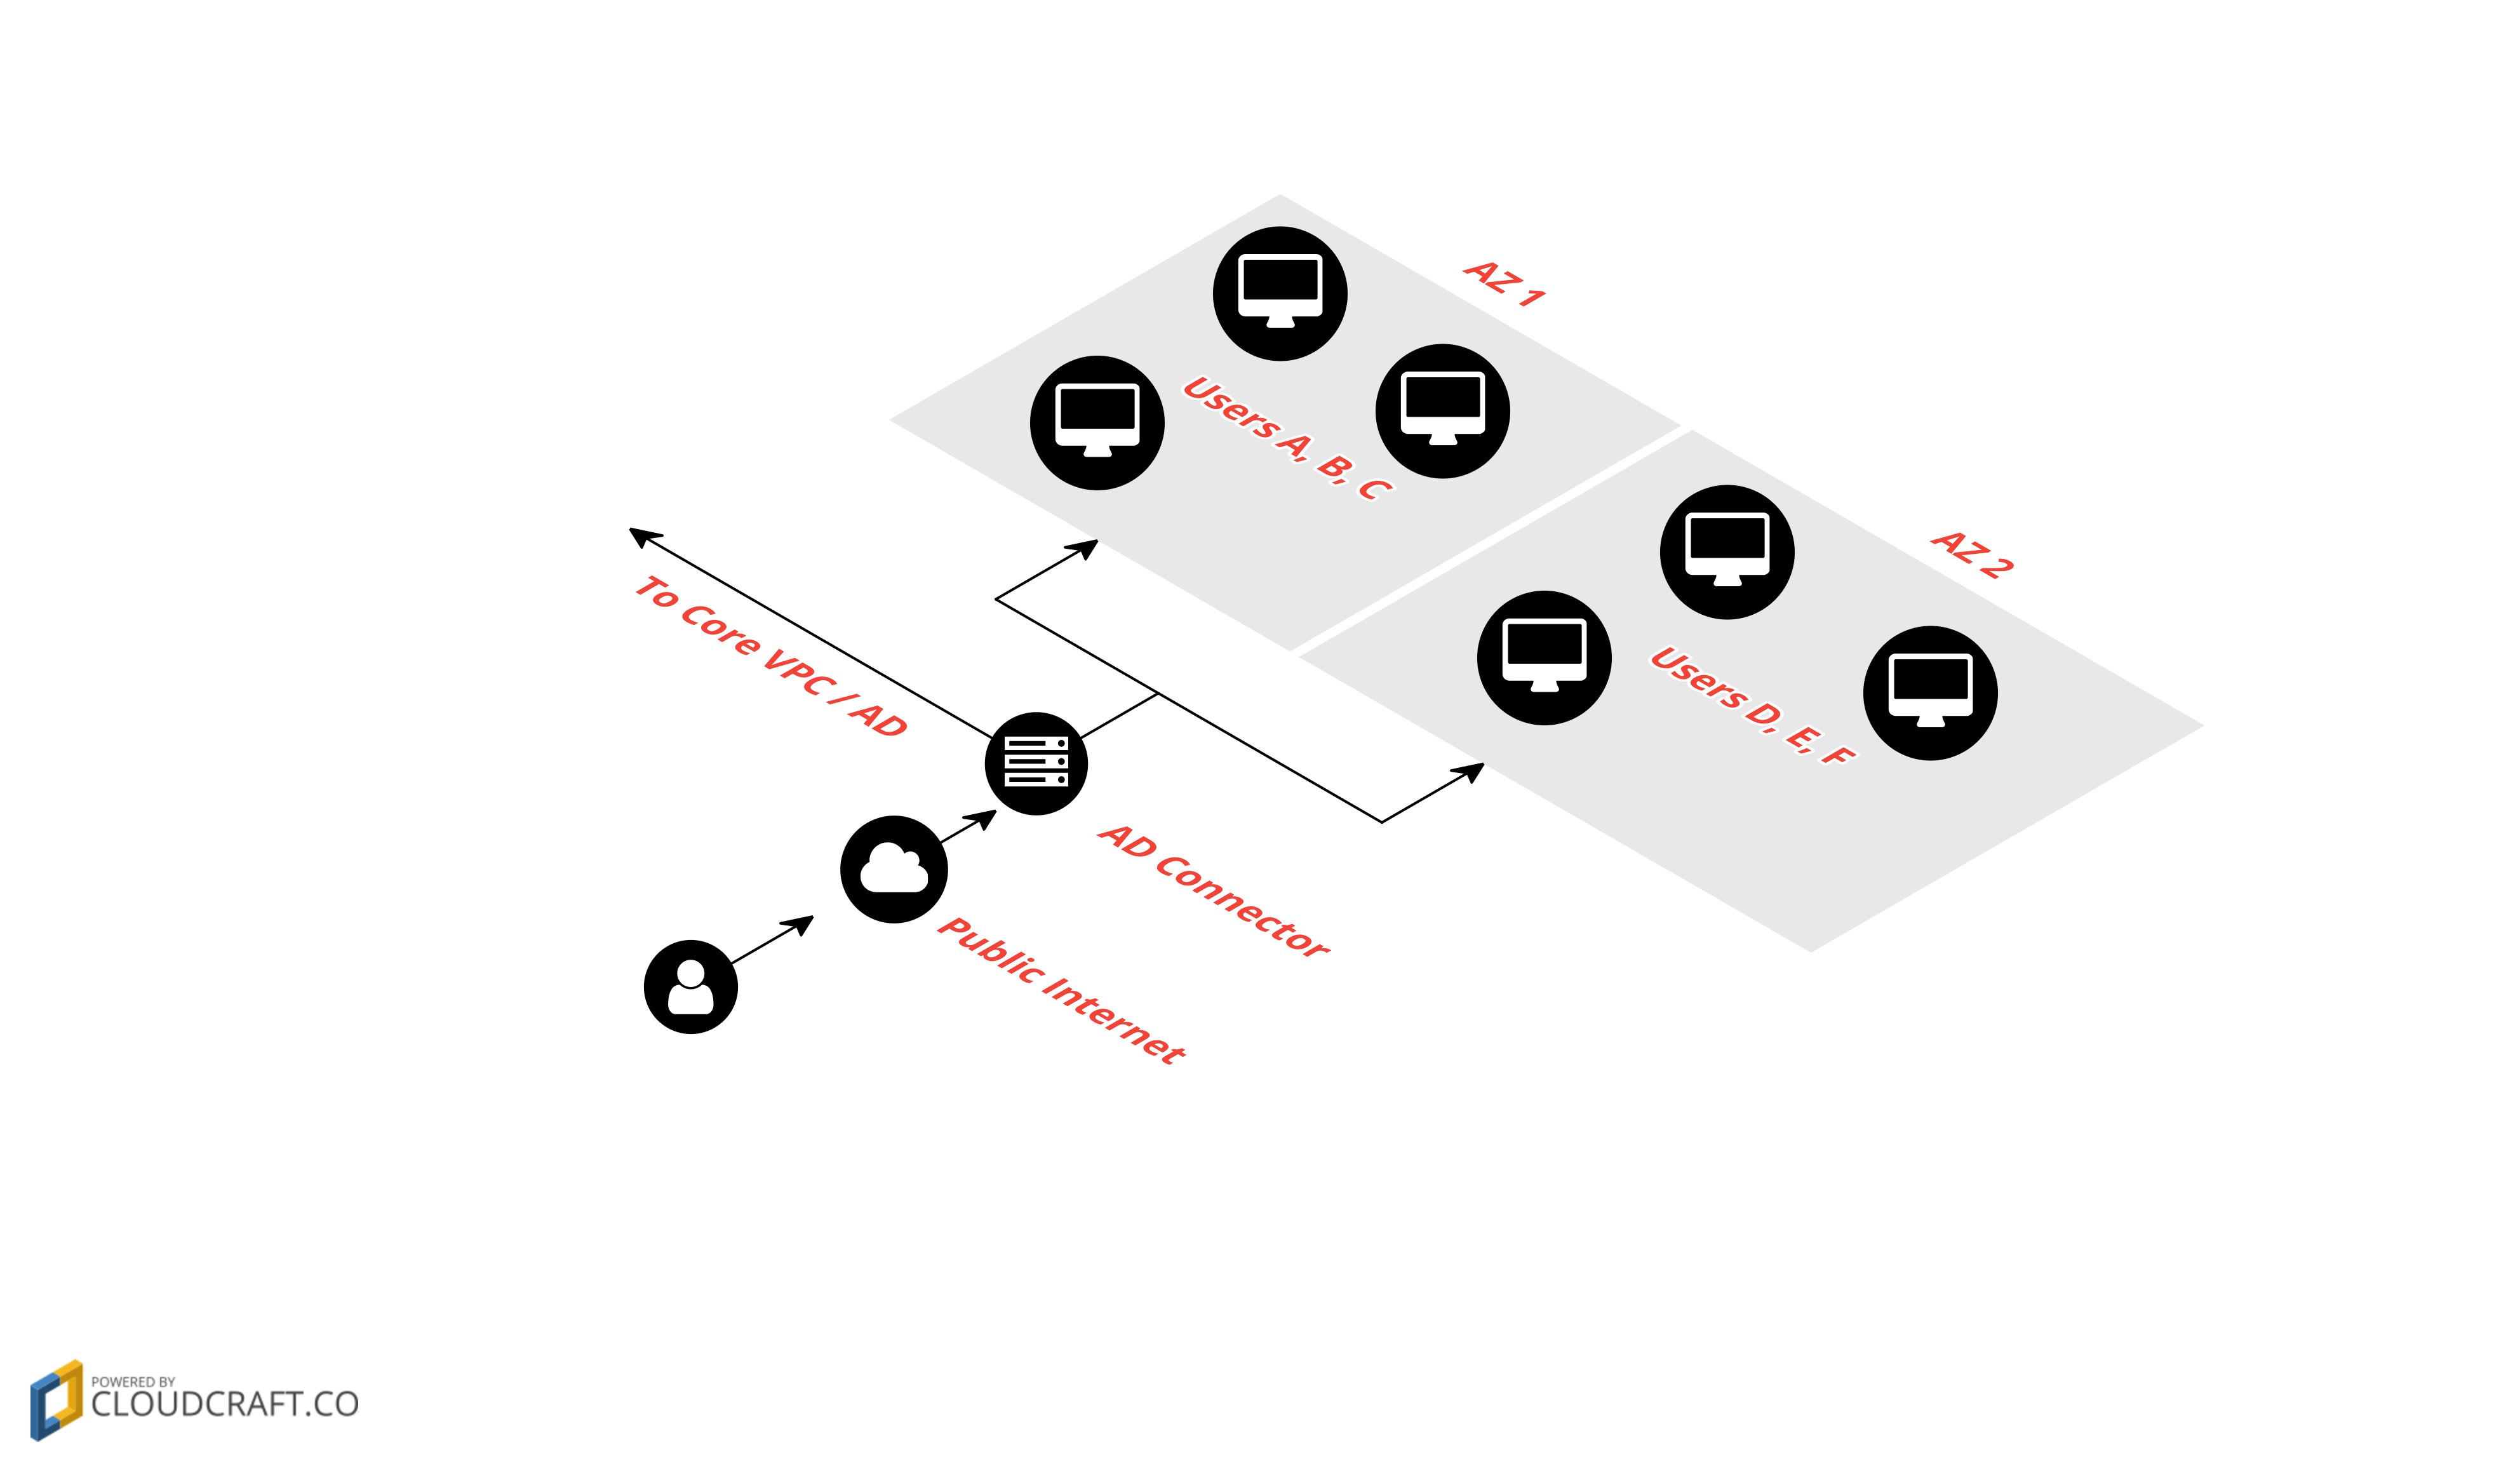
Amazon WorkSpaces requires an Active Directory domain as a base for assigning WorkSpaces to individual users. AWS Directory Service allows admins to create an AD Connector in order to integrate with CornellAD. The AD Connector acts as a proxy to CornellAD and has a Cornell HoldingID assigned to it. This special HoldingID is given permission to look up users and groups as well as create Computer Objects in a specific OU. If you are ready to create your AD Connector, send your request to cloud-support@cornell.edu and the IT@Cornell Cloud Team will create your WorkSpaces HoldingID and OrganizationalUnit (OU). You will be given the ability to manage your OU and apply Group Policy Objects (GPOs) as desired; WorkSpaces respect GPOs the same as any other computer would.
| Info |
|---|
| We recommend creating a minimum of two WorkSpaces Directories. One for admins to create images, and a second for users. You can create as many directories as you like but be sure to create sub-OU's under your top-level OU in order to organize computer objects by each directory. (You will not be charged for any small AD Connector that has at least one WorkSpace assigned). |
...
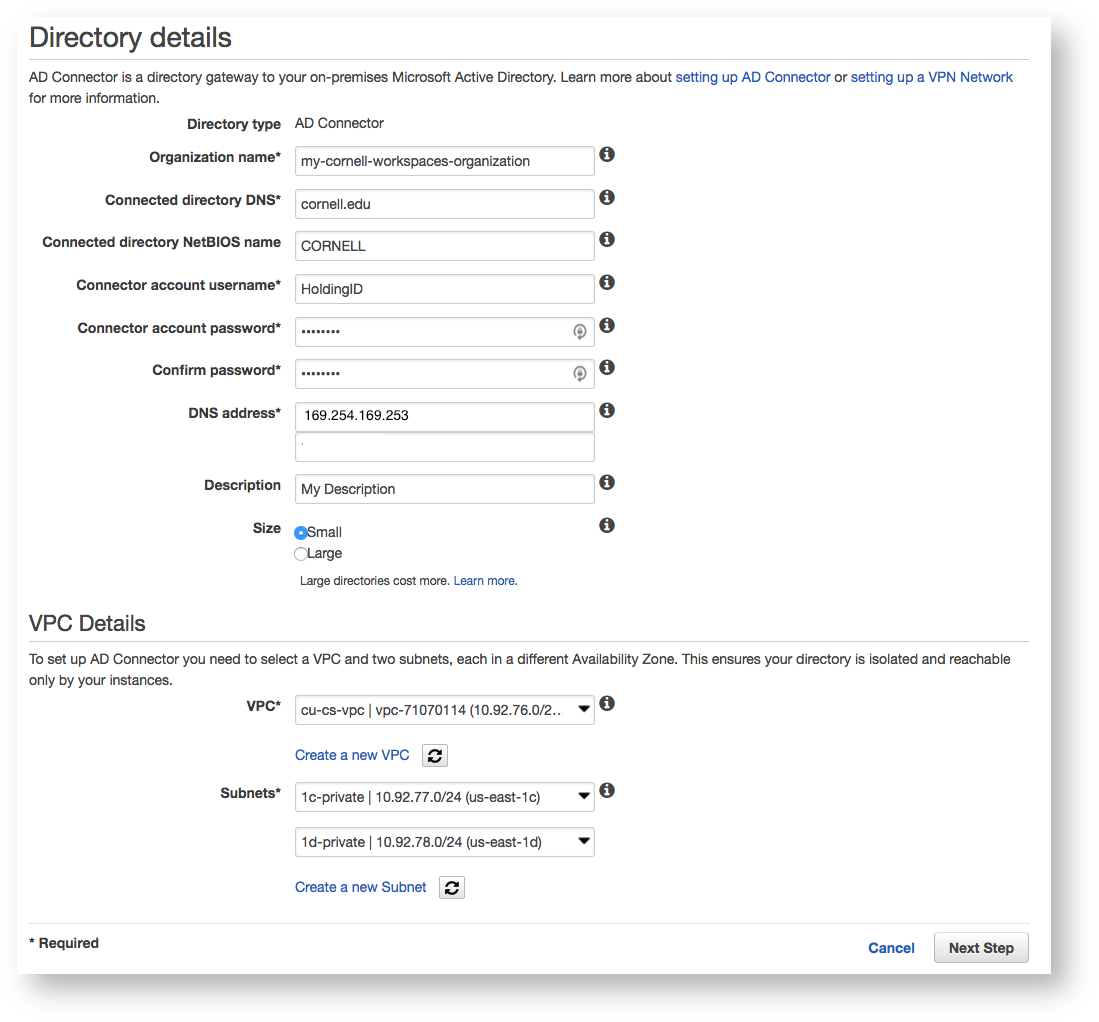
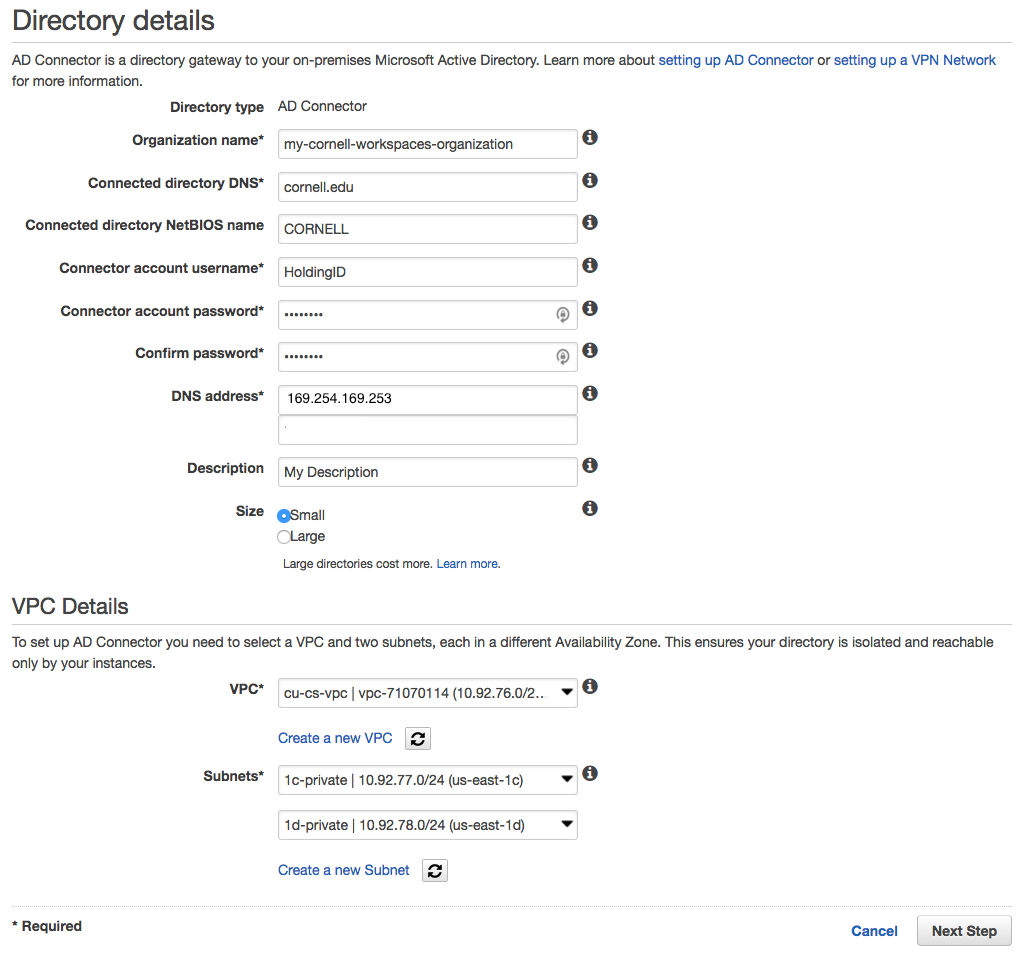
To create your AD Connector, log into your Cornell AWS Account, navigate to the WorkSpaces Directories Console, click the "Set up Directory" button and choose AD Connector as the directory type. The settings for the AD Connector are straightforward and an example configuration is outlined in the screenshot below. Be sure to place your AD Connector within your Cornell Standard VPC and your private subnets. All WorkSpaces you create within this directory will be created within the same subnets as the AD Connector. You will need to plan network space according to the number of users you plan to support.
...
| Info |
|---|
There are very few cases where you would want your WorkSpaces to be assigned public IP addresses. We recommend always placing them in private subnets so that they are protected by a NAT Gateway. |
Configuring a WorkSpaces Directory
...
- Target Domain and Organizational Unit
- Place the Distinguished Name for the OU assigned to you by the IT@Cornell Cloud Team
- Only the OU that is assigned to you will work, if you place any other OU here, your computer objects will fail to create. This is because they are named by AWS and will not conform to your object naming restrictions.
- You can create sub-OUs under the OU assigned to you. As long as the OU you designate here is underneath your assigned WorkSpaces OU, it will work fine.
- Security Group
- Assigning a Security Group to your WorkSpaces is optional.
- This would come in handy if you need to restrict WorkSpaces network access to other resources in your VPC. For example, an RDS database, file share or EC2 Instance.
- Access to Internet
- Although it seems counterintuitive, in almost all cases you want to disable this setting.
- Enabling this setting simply assigns each WorkSpace a public IP address. In the previous section, we recommended to place your WorkSpaces Directory within private subnets, so public IP addresses are not required.
- The advantage here is that all WorkSpaces will be behind a NAT Gateway and all traffic will come from a single public IP, that of the NAT Gateway itself. This benefits security and also makes it easier to open firewall rules to allow WorkSpaces to connect to publicly routed resources.
- There may be edge cases where your WorkSpaces need to be placed in public subnets and assigned public IP addresses. This is up to the discretion of the admins.
- Web Access
- Enable this setting unless you want to disable access to WorkSpaces via Web Browser.
- Enable this setting unless you want to disable access to WorkSpaces via Web Browser.
- Local Administrator Setting
- We recommend setting this to disabled for user directories and enabled for admin directories. However, this is up to the discretion of the admins.
- This setting controls user write privileges to the OS drive on the WorkSpaces. Users always have write privileges to their persistent User Profile.
- Keep in mind that if a WorkSpace is rebuilt, any changes to the OS drive will be overwritten by the new WorkSpaces Image. Only the User Profile persists between rebuilds.
- Admins can also control local administrator access on WorkSpaces via GPO instead of enabling this setting.
- Update AD Connector Account
- If you ever need to update the password on your assigned HoldingID, here is where you do it.
- If you ever need to update the password on your assigned HoldingID, here is where you do it.
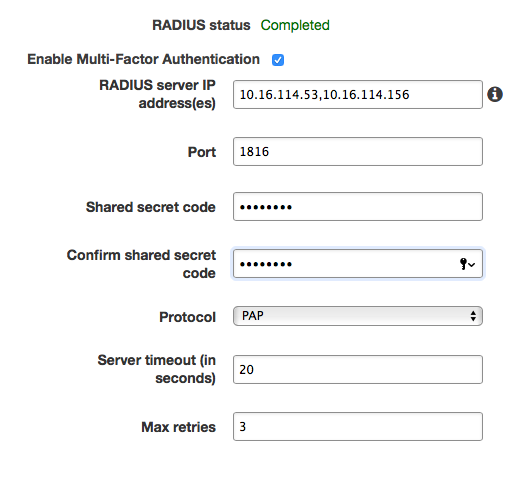
- Multi-Factor Authentication
- This allows you to configure MFA for your WorkSpaces via RADIUS.
- Please work with IdM to setup a RADIUS integration as they will need to provide a shared secret, IP addresses and any custom ports. Reference doc.
- Setup an AD Connector Directory within the Workspaces console.
- Provide IdM with the Directory IP addresses for firewall allows.
Enter RADIUS server IP addresses to the security group attached to the Directory.
- In MFA field in the Workspaces application, enter DUO code, 'push,' 'phone' or 'sms' for MFA authentication.
- Maintenance Mode
- We recommend always enabling this setting.
- This ensures that Auto-Stop WorkSpaces start up at least once per month to apply updates.
- Target Domain and Organizational Unit
...
- WorkSpaces Images
- The first step to creating WorkSpaces for your users is to create a WorkSpaces Image.
- This should have the latest Windows Updates and any management software and applications you want to maintain within the base image.
- We recommend creating a "Golden Image" as your base and using existing management tools to manage WorkSpaces like any other Desktop / Laptop on campus.
- WorkSpaces, and the images and applications that make them up, should adhere to CU Policy 5.10.
- WorkSpaces Bundles
- A bundle decides the OS Version, CPU, RAM, SSD and GPU resources available to a set of WorkSpaces.
- One Image is assigned to a Bundle, but the Image can be updated / swapped out with any other Image you create, at any time.
- Once a WorkSpace is created, its bundle cannot change, but you can update the Image within the Bundle and then Rebuild the WorkSpace to apply the updated Image.
- Rebuilding a WorkSpace with a new Image has a few caveats and is analogous to "re-imaging" a physical computer. Technically, the User Profile will persist, but file integrity is only guaranteed if a Rebuild is performed within a certain maintenance window. For this reason, we recommend using traditional management tools to administer WorkSpaces as if they were a physical computer.
- WorkSpace
- A WorkSpace is a single VM assigned to a single user.
- WorkSpaces have a "Registration Code" that is unique to each directory. Users will need this Registration Code to configure their client to connect to their assigned WorkSpace.
- When WorkSpaces are set up to use CornellAD, as outlined in this wiki, the user logs in with their Cornell NetID & Password.
- Only one WorkSpace can be assigned per user, per directory.
- You cannot change the user assigned to a WorkSpace, it is forever assigned to that user.
- WorkSpaces can be set to Always-On or Auto-Stop. We recommend using Auto-Stop in the majority of cases. The cost savings are significant and it only adds a minimal amount of time to resume a WorkSpace when a user connects.
- WorkSpaces can optionally have the OS Drive and / or User Profile encrypted at rest (full disk encryption). We recommend enabling full disk encryption, as it is a requirement for CU Policy 5.10.
- WorkSpaces Images
...
| Info |
|---|
WorkSpaces, and the images and applications that make them up, should adhere to CU Policy 5.10. |
WorkSpaces Application Manager (WAM)
...
To use WAM, you first create a WAM Package using the tools outlined in the AWS WAM documentation. Then you create a WAM Application with that Package assigned; the Application is configured with a version and AD group. You can update an Application with a new Package version any time you want. The model is very much analogous to the Image / Bundle concept for the WorkSpaces themselves.
| Info |
|---|
| Each WAM Application must be less than 5 GB. Using WAM also adds $5/mo to the price of every WorkSpace you create. If you can work within those constraints, WAM will work well for you. |
...
Bring Your Own License (BYOL)
There is a BYOL concept in WorkSpaces that allows an organization to shave $4/mo off the cost of each WorkSpace by implementing our Microsoft Windows Site License. However, a commitment of 200 WorkSpaces is required and a long administrative process is involved with AWS. If you are interested in BYOL for WorkSpaces, please get in touch with the IT@Cornell Cloud Team. We may also be able to negotiate WorkSpaces BYOL for all Cornell AWS accounts in the future.