 Sign-up for free online course on ANSYS simulations!
Step 1: Start-up and preliminary set-up
Create a folder
Create a folder called contact at a convenient location. We'll use this folder to store files created during the ANSYS session.
Start ANSYS
Start > Programs > ANSYS 7.1 > Configure ANSYS Classic
...
Specify diskscontact as your Initial jobname. Click on Run.
Resize the ANSYS windows as shown in this screen arrangement so that you can read instructions in the browser window and implement them in ANSYS.
Set Preferences
Main Menu > Preferences
In the Preferences for GUI Filtering dialog box, click on the box next to Structural so that a tick mark appears in the box. Click OK.
Recall that this is an optional step that customizes the graphical user interface so that only menu options valid for structural problems are made available during the ANSYS session. |
Enter Parameters
For convenience, we'll create scalar parameters corresponding to the principal radii of curvature of the upper and lower disks R1, R1', R2 and R2', load p, material properties E, n=nu and the initial interference between the disks, inter.
...
R1p=130
R2=80
R2p=200
inter=1e-5
p=4500
E=2e5
nu=0.29
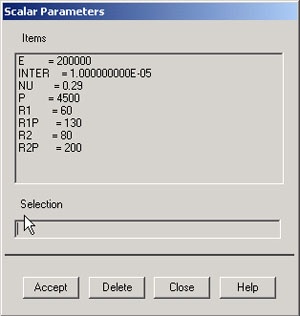
Close the Scalar Parameters window. Note that we have specified the radii in mm, the load p in N and the Young's modulus in N/mm2. Therefore, the displacement results we obtain will be in mm and the stresses in N/mm2.
...