| Include Page | ||||
|---|---|---|---|---|
|
| Panel |
|---|
Problem Specification |
...
| Include Page | ||||
|---|---|---|---|---|
|
Mesh
redAnTS generously offers you two different mesh generators:
...
In this tutorial, we'll create a new mesh using the Mapping Mesh Tool. Under Mesh, click on Create Mapping . This brings up the MappingMeshTool GUI.
Define Drawing Palette
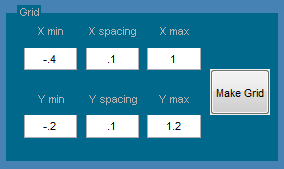
We'll first create the domain i.e. the rectangle, and then mesh it. Let's define the palette on which we'll draw the domain and overlay grid lines on the palette. This is done using the Grid options on the top, right corner of the GUI. The grid lines are helpful in determining coordinates of points. From the problem statement, the range of the drawing palette is chosen as -0.40<x<1 and -0.2<y<1.2. This will fit the domain within the palette with a little bit of space to spare around the edges. We'll choose the spacing of the grid lines to be 0.1 in x and y directions. Thus, enter Xmin=-0.4, X spacing=0.1, Xmax=1, Ymin=-0.2, Y spacing=0.1, and Ymax=1.2. (As you enter these values, you can jump to the next entry using the Tab key.) Click on Make Grid.
Draw Rectangular Domain
In redAnTS, each domain is composed of one or more subdomains. redAnTSrequires that each subdomain be a four-sided region defined by eight vertices (the corners and midpoints of each side). The vertices must be defined in a counterclockwise direction around the subdomain, starting with any corner. Since our geometry is a nice rectangular shape, we need only one subdomain. The eight vertices for the subdomain are defined starting from the lower, left corner as shown below.
...
Tip: It's easier to make a spreadsheet in Excel to calculate the vertex locations and then copy the values from Excel into the edit boxes under Vertex positions.
Choose Number of Subdivisions
After the geometry has been set, we need to divide the geometry into several subdivisions, called elements.
...
Let's keep the fun going by moving on to Step 4 where we will specify inputs such as material properties and boundary conditions.
 Sign-up for free online course on ANSYS simulations!