

Problems with Copy-and-Paste
Users have been reporting problems with the copy and paste functions in their web browsers. If you experience this, it may help to log out of Virtual DBeaver, clear the cache in your web browser, and log back in. Also, the Chrome web browser works best with Virtual DBeaver on Windows, and the Safari web browser works best on Macs.
Log in to your Virtual DBeaver account
To use your Virtual DBeaver account:
- Open a web browser window and go to the Virtual DBeaver URL -
https://rdweb.wvd.microsoft.com/arm/webclient/index.html
Choose "Virtual DBeaver"
- At the "Access local resources" prompt, click Allow
- At the "Enter your credentials" prompt, enter your full Cornell email address in the Username field and your email password in the Password field, then click Submit.
- Click the DBeaver shortcut on the desktop to open DBeaver. If this is your first time connecting, please follow the instructions to "Configure Your Connection to the Reporting Database in Virtual DBeaver."
- From the SQL Editor menu, choose New SQL script
Select the Report Query to Run
To select the report query you would like to run, go to the FOLIO Canned Reports Directory.
- Click the query code link (e.g., CR100)
- Click the sql file to open it
- Click Raw in the top right corner of the window
- Click Ctrl+A then Ctrl+C to select and copy all the text of the query
- Return to your Virtual DBeaver window
- Click Ctrl+V to paste the text of the query into the New SQL script window
- From the File menu, select Save to save this query in DBeaver with a filename and the ".sql" file extension
- From the SQL Editor menu, choose Execute SQL Script to run your query
- Review your results in the bottom half of your window
Select Filters
Filters allow you to refine your query to give you results that are limited by certain criteria, such as location. To add filters:
- Return to the query in your Virtual DBeaver window.
- Look for the WITH statement near the beginning of the query
- In the SELECT statement under WITH, enter filters within the single quote marks
- Run your query and review the results in the bottom half of the window
- Continue adjusting your filters as needed using the same approach
- From the File menu, select Save to save this query in DBeaver with a filename and the ".sql" file extension
- Just above your query, make sure the ldp_cornell data source has been selected

- Review your results in the bottom half of your window
- From the SQL Editor menu, choose Execute SQL Script to run your query
- Review your results in the bottom half of your window
Filter Selection Example
Here is an example of setting date and location filters in the CR100 loans_and_renewals_counts query.
- Follow steps above to Select the Report Query to Run, and choose the CR100 query
- Return to the query in your Virtual DBeaver window
- Look for the WITH statement near the beginning of the query
- In the SELECT statement under WITH, look for the start and end date parameters to set the date

- To show results for the period of 6/1/21 through 6/15/21, go to the SELECT statement under WITH and enter those start and end dates within the single quote marks

- To show results for just the Olin library location, go to the SELECT statement under WITH and enter Olin in the single quote marks next to items_effective_location_filter

- Just above your query, make sure the ldp_cornell data source has been selected

- Right-click on the name of the default script (here, the name is "Script-1"), then choose Rename File
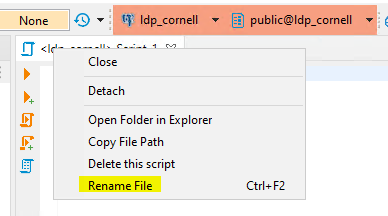
- Give your file a name with the .sql extension, such as "loans_and_renewals_counts_olin.sql"
- From the SQL Editor menu, choose Execute SQL Script to run your query
- Review your results in the bottom half of your window
Export Results to CSV
You can export your query results to CSV if you would like to use them in Excel. To export your results:
- Return to the query in your Virtual DBeaver window
- From the SQL Editor menu, choose Execute SQL Script to run your query
- Right-click on any part of the results set shown in the bottom right side of the window and choose Export data...
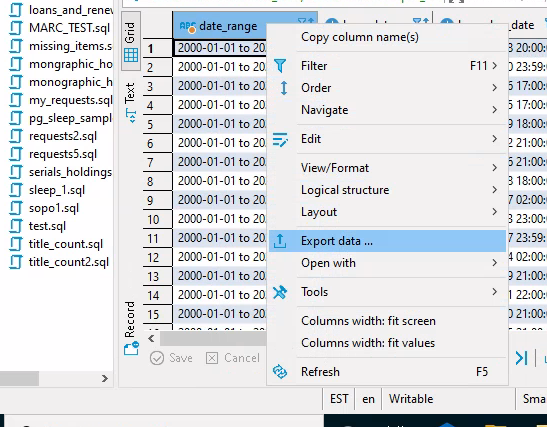
- Choose Export to CSV file(s)

- On Extraction Settings, click Next. On Format Settings, click Next.
- On Output Settings, click the orange folder icon and navigate to your C:\Users\[netid]\OneDrive - Cornell University\Desktop folder. The Directory field should populate with this path. If you do not have a One Drive - Cornell University folder, choose your Desktop folder instead, and continue to follow the set of instructions below for using the Share feature to send yourself the file. If you would like to know more about why you could not find One Drive, please contact CUL Desktop Services.
- In the File name pattern field, enter a filename for the report you are running.
- If you want a timestamp automatically appended to the filename in your output, include the TimeStamp pattern you prefer (yyyyMMddHH) in the TimeStamp pattern field. If you do not wish to include a TimeStamp Pattern, simply erase the settings in this field. Click Next when your settings are complete.

- On the Confirm window, click Proceed to start the data export.
- Close or minimize your DBeaver window so that you can see the desktop of your Virtual DBeaver environment.
- Your exported file should appear in 2 places (which are actually the same place through the magic of Windows virtual environments): on the Desktop of your Virtual DBeaver environment and, if you open File Explorer outside of Virtual DBeaver and browse, on your One Drive - Cornell University/Desktop folder
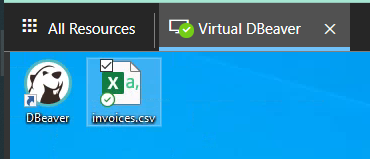
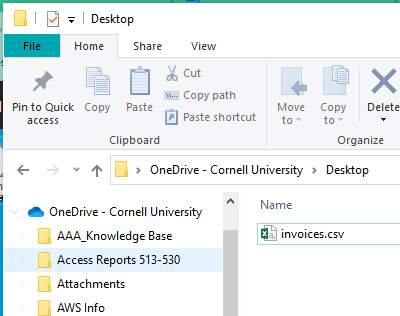
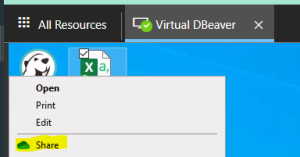
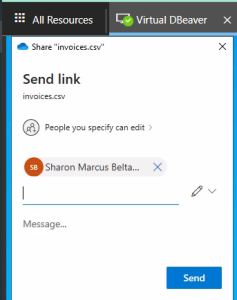
Another way to move your exported file is to right-click on the file in Virtual DBeaver, choose Share, enter your email address in the "To:" field, and press Send. You can then open your email on your main computer and save the attached file to wherever you want on that computer. This is the best option for Mac users, since they do not typically use One Drive.
- Open your CSV file with Excel, then Save it with the .xls Excel file type
Find Your Saved Query to Run Again
Once you have saved your query, you can return to that query to run it again. To find it:
- From the Window menu, choose Project Explorer
- From the Project - General pane, open the Scripts folder
- Choose your saved query from the scripts in this folder
- Double-click on the file name to open the query
Some tips for working in Virtual DBeaver (DRAFT):
- Enter/exit full screen: When in DBeaver on virtual desktop, to make all of your screen/any popup windows fully visible, click on the double arrow icon in the upper right corner of the screen (in the black band). This will also allow you to: scroll and copy more efficiently; see the task bar of the virtual desktop to view files exported from DBeaver, etc.; and see all options in popup windows. When you want to access the task bar of your own computer again, click on the double arrow icon to toggle back to a slightly minimized view.
- Saving your work: When writing SQL, be sure to save your work. You can use Ctrl-S, right click and click on save, or click on the on the file tab and then click on save.
- Viewing latest local table results: When you run a report that saves tables to a local schema, right click on the “tables” icon of the local schema and click on “Refresh” to see the latest data. Alternatively, use F5.
- Restoring/minimizing Database Navigator and Projects windows: If you mistakenly close your Database Navigator or Projects window, click on the Window Tab, and click on “Database Navigator” and “Project Explorer” to get them back. You can minimize or restore those windows using the icons at the top of the window.
- Running parts of an SQL script: In a set of queries or within a query, you can run a query/subquery by highlighting what you want to run and clicking on the execute SQL script icon.
- Stopping a query run: If you mistakenly run a query or set of queries you don’t want to run (or run in full): expand your screen; double click on the green flashing bar in the lower right; click on the red square in the window that opens; and then click on “stop” in the window that opens.
![]()


