redAnTS generously offers you two different mesh generators:
Click on the drop-down menu under Mesh. You'll see the following options:
Option |
Description |
Import Mapping |
Import a mesh file previously created with the Mapping Mesh Tool. |
Import CSGTool |
Import a mesh previously created with the CSG Mesh Tool. |
Create Mapping |
Create a new mesh with the Mapping Mesh Tool. |
CreateCSGtool |
Create a new mesh with the CSG Mesh Tool. |
Note that there is also Help available for this menu. Click on Help and scan through it to get an idea of the online information that is available. Dismiss the help window.
In this tutorial, we'll create a new mesh using the Mapping Mesh Tool. Under Mesh, click on Create Mapping . This brings up the MappingMeshTool GUI.
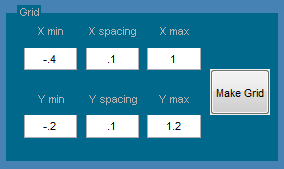
We'll first create the domain i.e. the rectangle, and then mesh it. Let's define the palette on which we'll draw the domain and overlay grid lines on the palette. This is done using the Grid options on the top, right corner of the GUI. The grid lines are helpful in determining coordinates of points. From the problem statement, the range of the drawing palette is chosen as -0.40<x<1 and -0.2<y<1.2. This will fit the domain within the palette with a little bit of space to spare around the edges. We'll choose the spacing of the grid lines to be 0.1 in x and y directions. Thus, enter Xmin=-0.4, X spacing=0.1, Xmax=1, Ymin=-0.2, Y spacing=0.1, and Ymax=1.2. (As you enter these values, you can jump to the next entry using the Tab key.) Click on Make Grid.

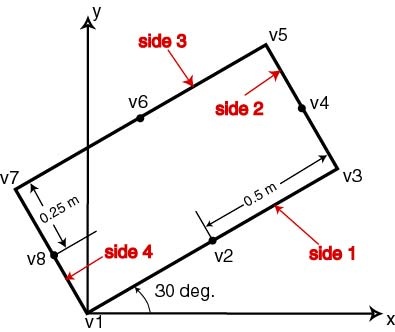
In redAnTS, each domain is composed of one or more subdomains. redAnTSrequires that each subdomain be a four-sided region defined by eight vertices (the corners and midpoints of each side). The vertices must be defined in a counterclockwise direction around the subdomain, starting with any corner. Since our geometry is a nice rectangular shape, we need only one subdomain. The eight vertices for the subdomain are defined starting from the lower, left corner as shown below.

The mid-point vertices v2,v4,v6, and v8 are located half-way along the sides. This will create a mesh of uniform element size. Note that locating the mid-point vertices nearer to one corner would create a mesh of varying element size. You could use this feature to concentrate elements in regions of stress concentration. In general, the three vertices of each side of a subdomain do not need to lie along a straight line; a parabola is fit to them. See the help pages for MappingMeshTool for more details on how to construct your mesh for a general geometry. The help pages can be accessed by clicking on Help in the MappingMeshTool GUI. Sometimes you have to click Help twice before the help pages are pulled up in the MATLAB help window.
From the above figure, the vertex locations (in MATLAB syntax) are as follows:
Vertex |
x |
y |
v1 |
0 |
0 |
v2 |
0.5*cosd(30) |
0.5*sind(30) |
v3 |
cosd(30) |
sind(30) |
v4 |
cosd(30) - 0.25*sind(30) |
sind(30) + 0.25*cosd(30) |
v5 |
cosd(30) - 0.5*sind(30) |
sind(30) + 0.5*cosd(30) |
v6 |
0.5*(cosd(30) - sind(30)) |
0.5* (sind(30) + cosd(30)) |
v7 |
-0.5*sind(30) |
0.5*cosd(30) |
v8 |
-0.25*sind(30) |
0.25*cosd(30) |
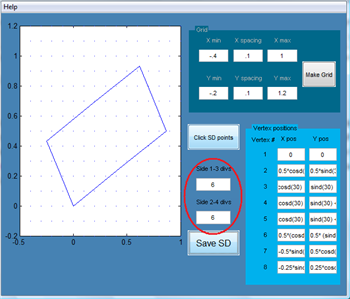
There are two options for creating the eight vertices: we can use the mouse after pressing the Click SD Points button, or we can enter the coordinates directly into the edit boxes under Vertex positions. We'll use the latter option. Enter the above coordinates in the corresponding edit boxes under Vertex positions as shown below. You can use MATLAB expressions within these boxes. For instance, for the x coordinate of the fifth vertex, enter cosd(30)-0.5*sind(30) under Xpos. Remember, if you are entering the angles into the Mesh GUI in degrees, you must use the MATLAB functions sind and cosd.
Tip: It's easier to make a spreadsheet in Excel to calculate the vertex locations and then copy the values from Excel into the edit boxes under Vertex positions.
After the geometry has been set, we need to divide the geometry into several subdivisions, called elements.
First, we need to enter the number of divisions for each side. This specifies the number of elements that will be created along each side. Opposite sides need to have an equal number of divisions. So, in the above schematic of vertex positions, sides 1 and 3 should have an equal number of divisions as should sides 2 and 4. (Notice that sides are numbered in the same counterclockwise order as vertices, starting at the first vertex.)
It is important to note that the number of subdivisions can greatly affect the solution. If too few subdivisions are used the program's output might not represent the true state of stress well; if too many subdivisions are used, the program may run for hours or fail. Because of the simplicity of this problem, we do not need to use a very fine mesh: we'll use 6 divisions for each side. So enter 6 for Side 1-3 divs as well as Side 2-4 divs (see figure below).

Click on Save SD to create the subdomain. Since we have only one subdomain, select No in reponse to "Do you want to add another subdomain?". A dialog box pops up asking "Do you want to review the mesh coordinates"? This is the point at which you can review and correct any mistakes in creating the subdomain. Select Yes. Make sure the vertex positions have been entered correctly and click on Accept SD.
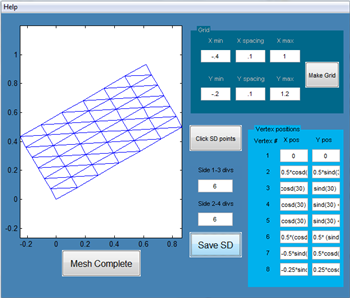
You will get a message saying that there are "0 internal boundaries". This is so because we have only one subdomain. In the Mesh Base Name window, enter rect as the Filename and click OK. Check that the file rect_mesh.dat has been saved in your working folder. The finite-element mesh is displayed in the MappingMeshTool GUI.

This completes mesh creation. Click on Mesh Complete. This puts us back in the main redAnTS GUI. We see under Current Settings that rect_mesh.dat is the mesh file we are working with. To plot the mesh in this GUI, click on the drop-down menu under Plotting and select Mesh.
Let's keep the fun going by moving on to Step 4 where we will specify inputs such as material properties and boundary conditions.
Go to all MATLAB Learning Modules