Author: John Singleton and Rajesh Bhaskaran, Cornell University
Problem Specification
1. Pre-Analysis & Start-up
2. Geometry
3. Mesh
4. Setup (Physics)
5. Solution
6. Results
7. Verification & Validation
Under Construction
This page of this tutorial is currently under construction. Please check back soon!!!!!!!!!!!!!!
Useful Information
Click here for the FLUENT 6.3.26 version.
Step 5: Solution
Second Order Scheme
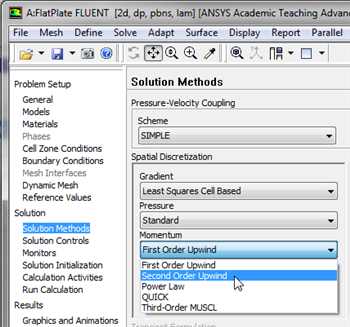
A second-order discretization scheme will be used to approximate the solution. In order to implement the second order scheme click on Solution Methods then click on Momentum and select Second Order Upwind as shown in the image below.
Solution > Monitors > Residuals
Set Absolute Criteria for all equations to 1e-6.
Higher Resolution Image
Also, under Options, select Plot. This will plot the residuals in the graphics window as they are calculated, giving you a visual feel for how the iterations are proceeding to convergence.
Click OK.
Solution > Solution Initialization
Use the inlet conditions as our initial guess value. Select inlet under Compute From.
Click Initialize.
We'll iterate the solution until the residual for each equation falls below 1e-6.
Main Menu > File > Write > Case...
This will save your FLUENT settings and the mesh to a "case" file. Name the file plateBL.cas and click OK.
To run the simulation go to:
Solution > Run Calculation
Set the Number of Iterations to 1000. Click Calculate.
Note: There is a bug on FLUENT and you might need to double or triple click the Calculate button to start the simulation.
The residuals for each iteration are printed out as well as plotted in the graphics window as they are calculated and the calculation should converge in about 561 iterations.
Save the solution to a data file after solution is converged by going to:
Main Menu > File > Write > Data...
Enter plateBL.dat for Data File and click OK. Check that the file has been created in your working directory. You can retrieve the current solution from this data file at any time.
Go to Step 6: Results
 Sign-up for free online course on ANSYS simulations!
