Contacts: Mary Campany
Unit: Metadata Design and Operations
Date last updated: June 2023
Date of next review: June 2024
Creating a Spreadsheet to Review Changed/Split Subject Headings
- Use steps 7-13 in “Batch edit workflow” to retrieve the relevant bibliographic records as a .mrc/.mrk file. (Either a .mrc or a .mrk may be used for this process.)
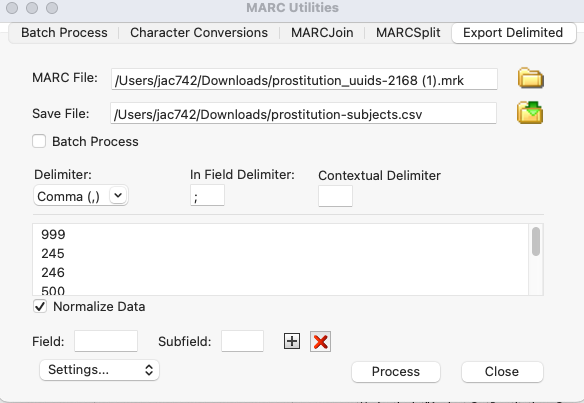
- In MarcEdit, select Export > Export Tab Delimited Records from the Tools drop down menu.

- In the MARC Utilities window, do the following:
- MARC File: select the folder icon to select the source file containing the bibliographic records retrieved from FOLIO.
- Save File: select the folder icon to select the location of where you would like to save the csv file, and name the csv file. Make sure you use the .csv extension in your filename.
- Delimiter: Select Comma(,)
- In Field Delimiter: This will be used to separate values for fields that have multiple entries. For example, if a record contains more than one 650, each 650 will appear in the column separated by the indicated delimiter. You may use whatever you’d like, but default is a semi-colon (;).
(If you are using Windows, select “Next” to move on to the next section) - Field: Enter the MARC values for the fields you wish to add to the csv, and select the “+” button to add them.
- The fields that are generally useful for subject changes/splits are the 999 $i (for batch editing), 245, 246, 500, 505, 520, 650, and 651.
- If you do not specify a subfield, the csv will include all subfields.
- Checking the “Normalize Data” box will replace MARC subfield letters with normalized spaces/punctuation (e.g. an em dash instead of a $x in the 650, or a space instead of a $b in a 245).
- When all fields are added, select “Process” (“Export” on Windows). You should see a message that says “Items have been exported to [file location/filename.csv].”
- A CSV file should appear in your destination folder. You can open this file in Excel or OpenRefine.
...